
Setting Up a Pre-Order on Curios
This tutorial will walk you through how to use Curios for a pre-order. Curios works particularly well for a pre-order for the following reasons:
You keep 100% of any sales — there is no loss, which allows you to discount your offerings to make the pre-order appealing.
Curios has instant fulfillment baked in. When your item goes live you won't have to find another service to deliver the files and coordinate the delivery date.
You garner the email addresses right away, so you can keep buyers well informed of any updates.
You can schedule price changes, so the minute the item goes from pre-order to live, the price can change too.
Curios integrates with BookVault for any domestic or global Print on Demand books or merchandise.
To set up a pre-order on Curios
Step 1: Log in
Go to studio.curios.com and log in with your email address, then enter the code provided.
Step 2: Start a new product
Click + Publish / Add New Product in the left-hand menu.
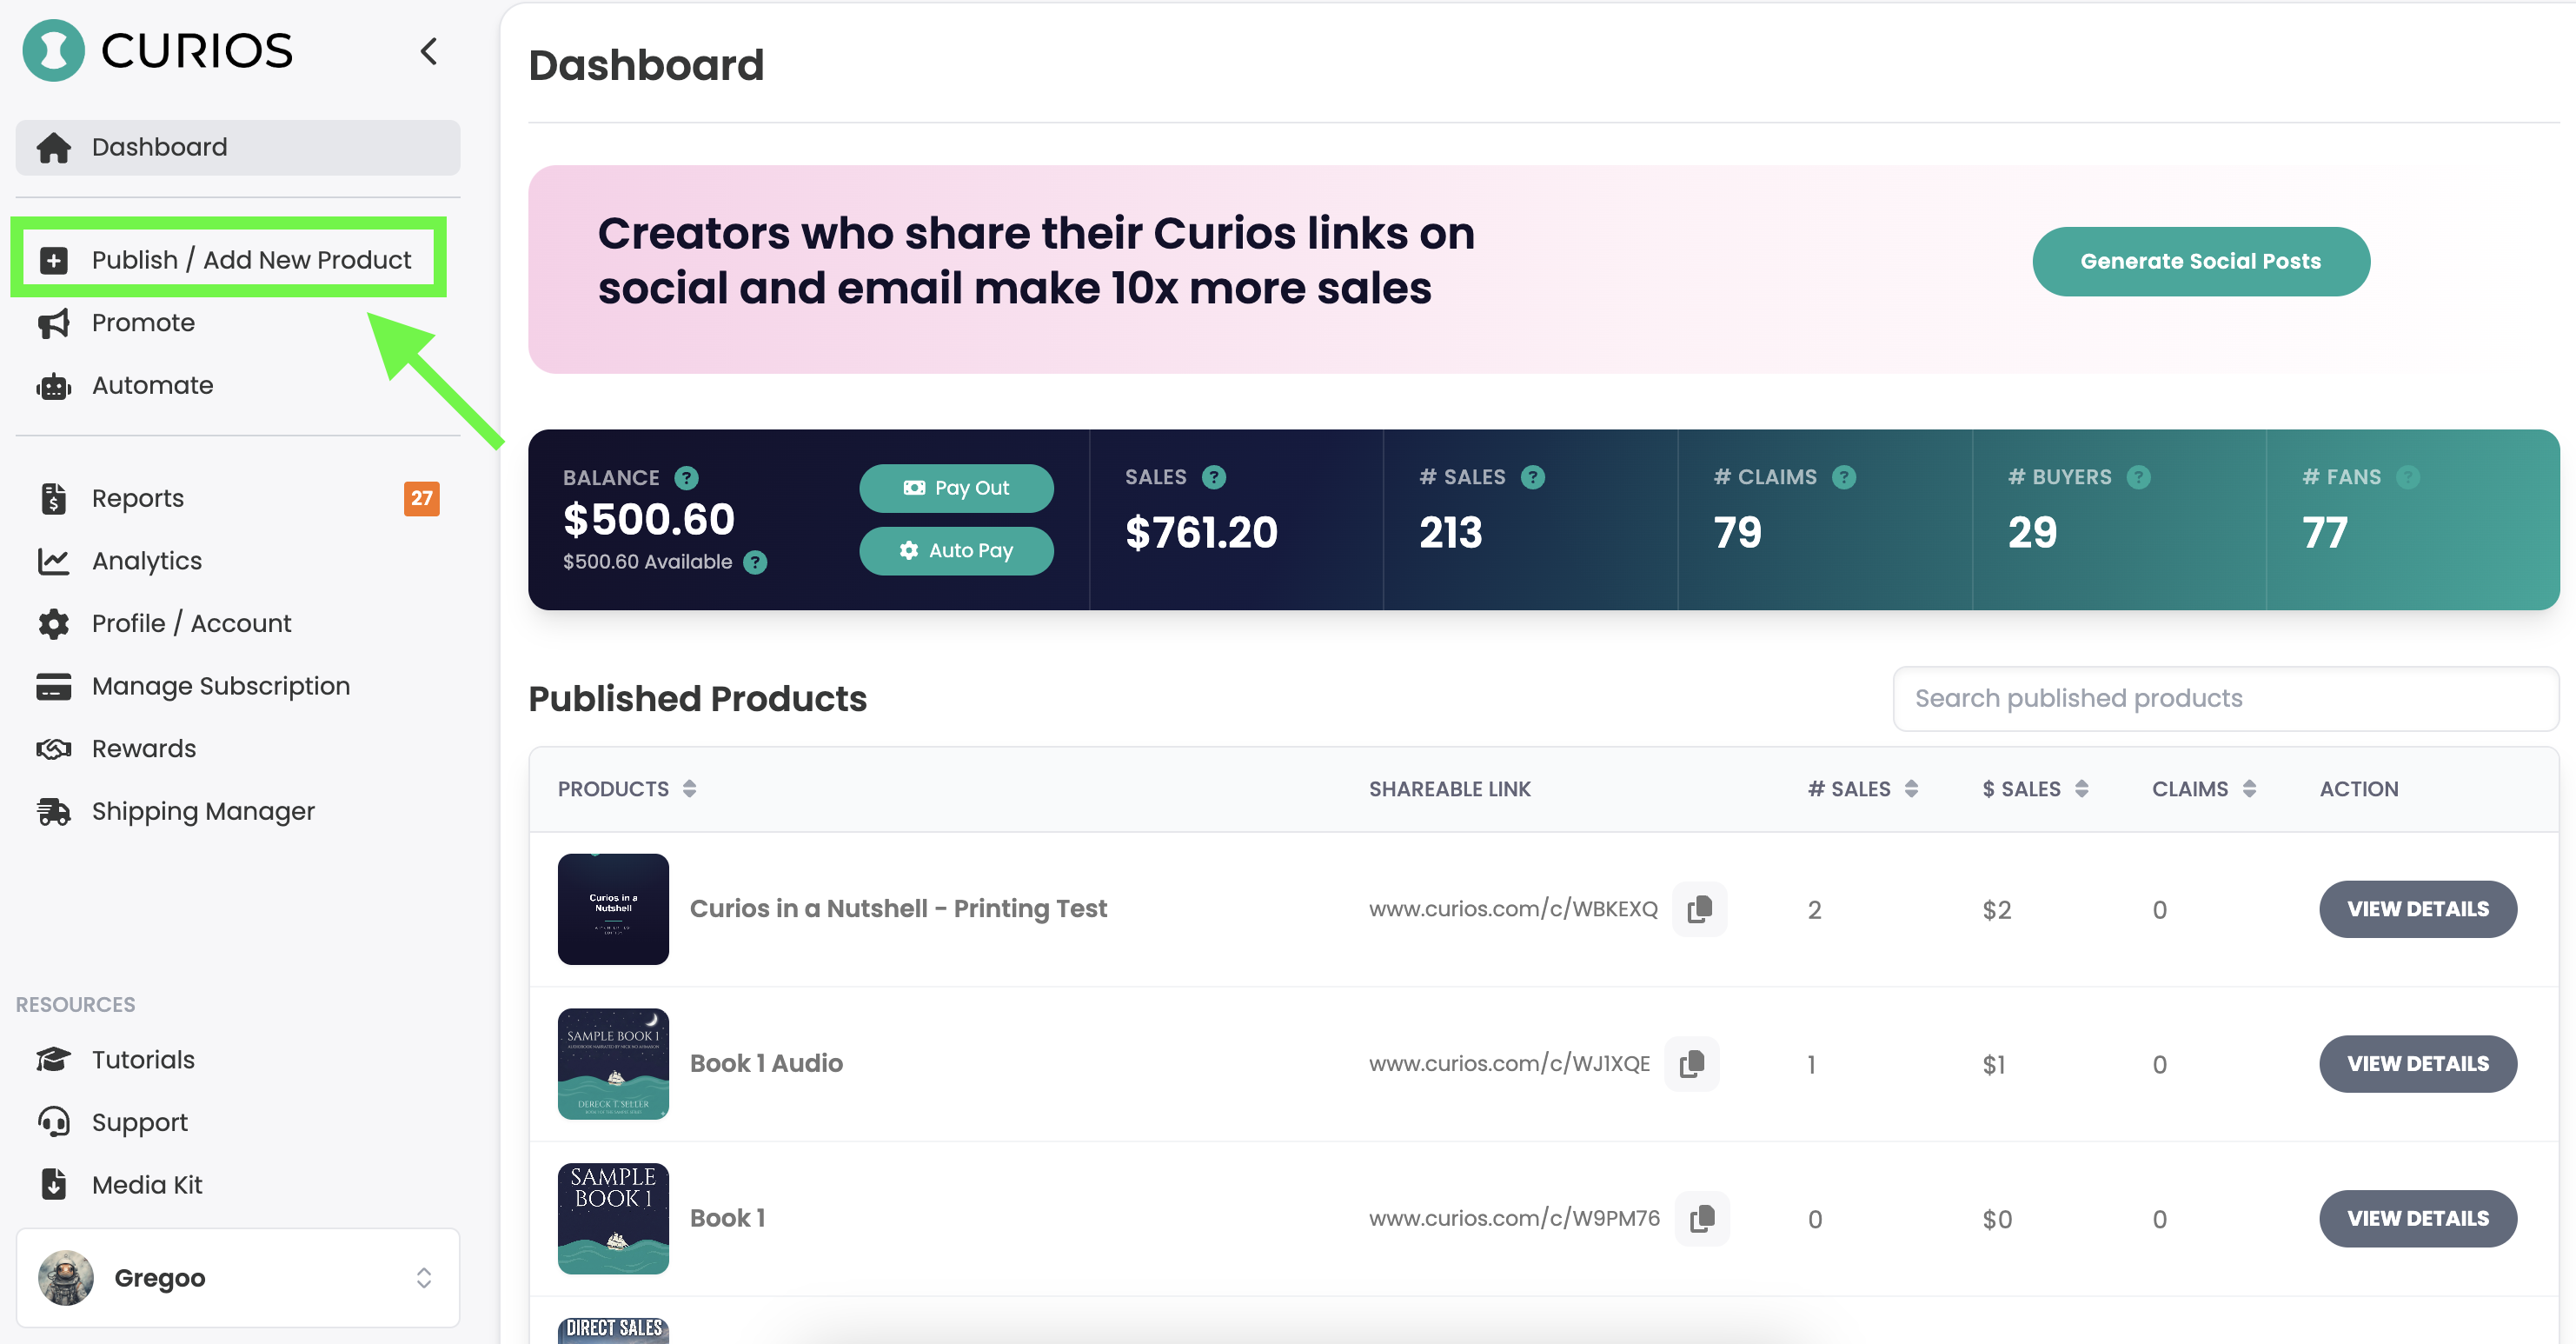
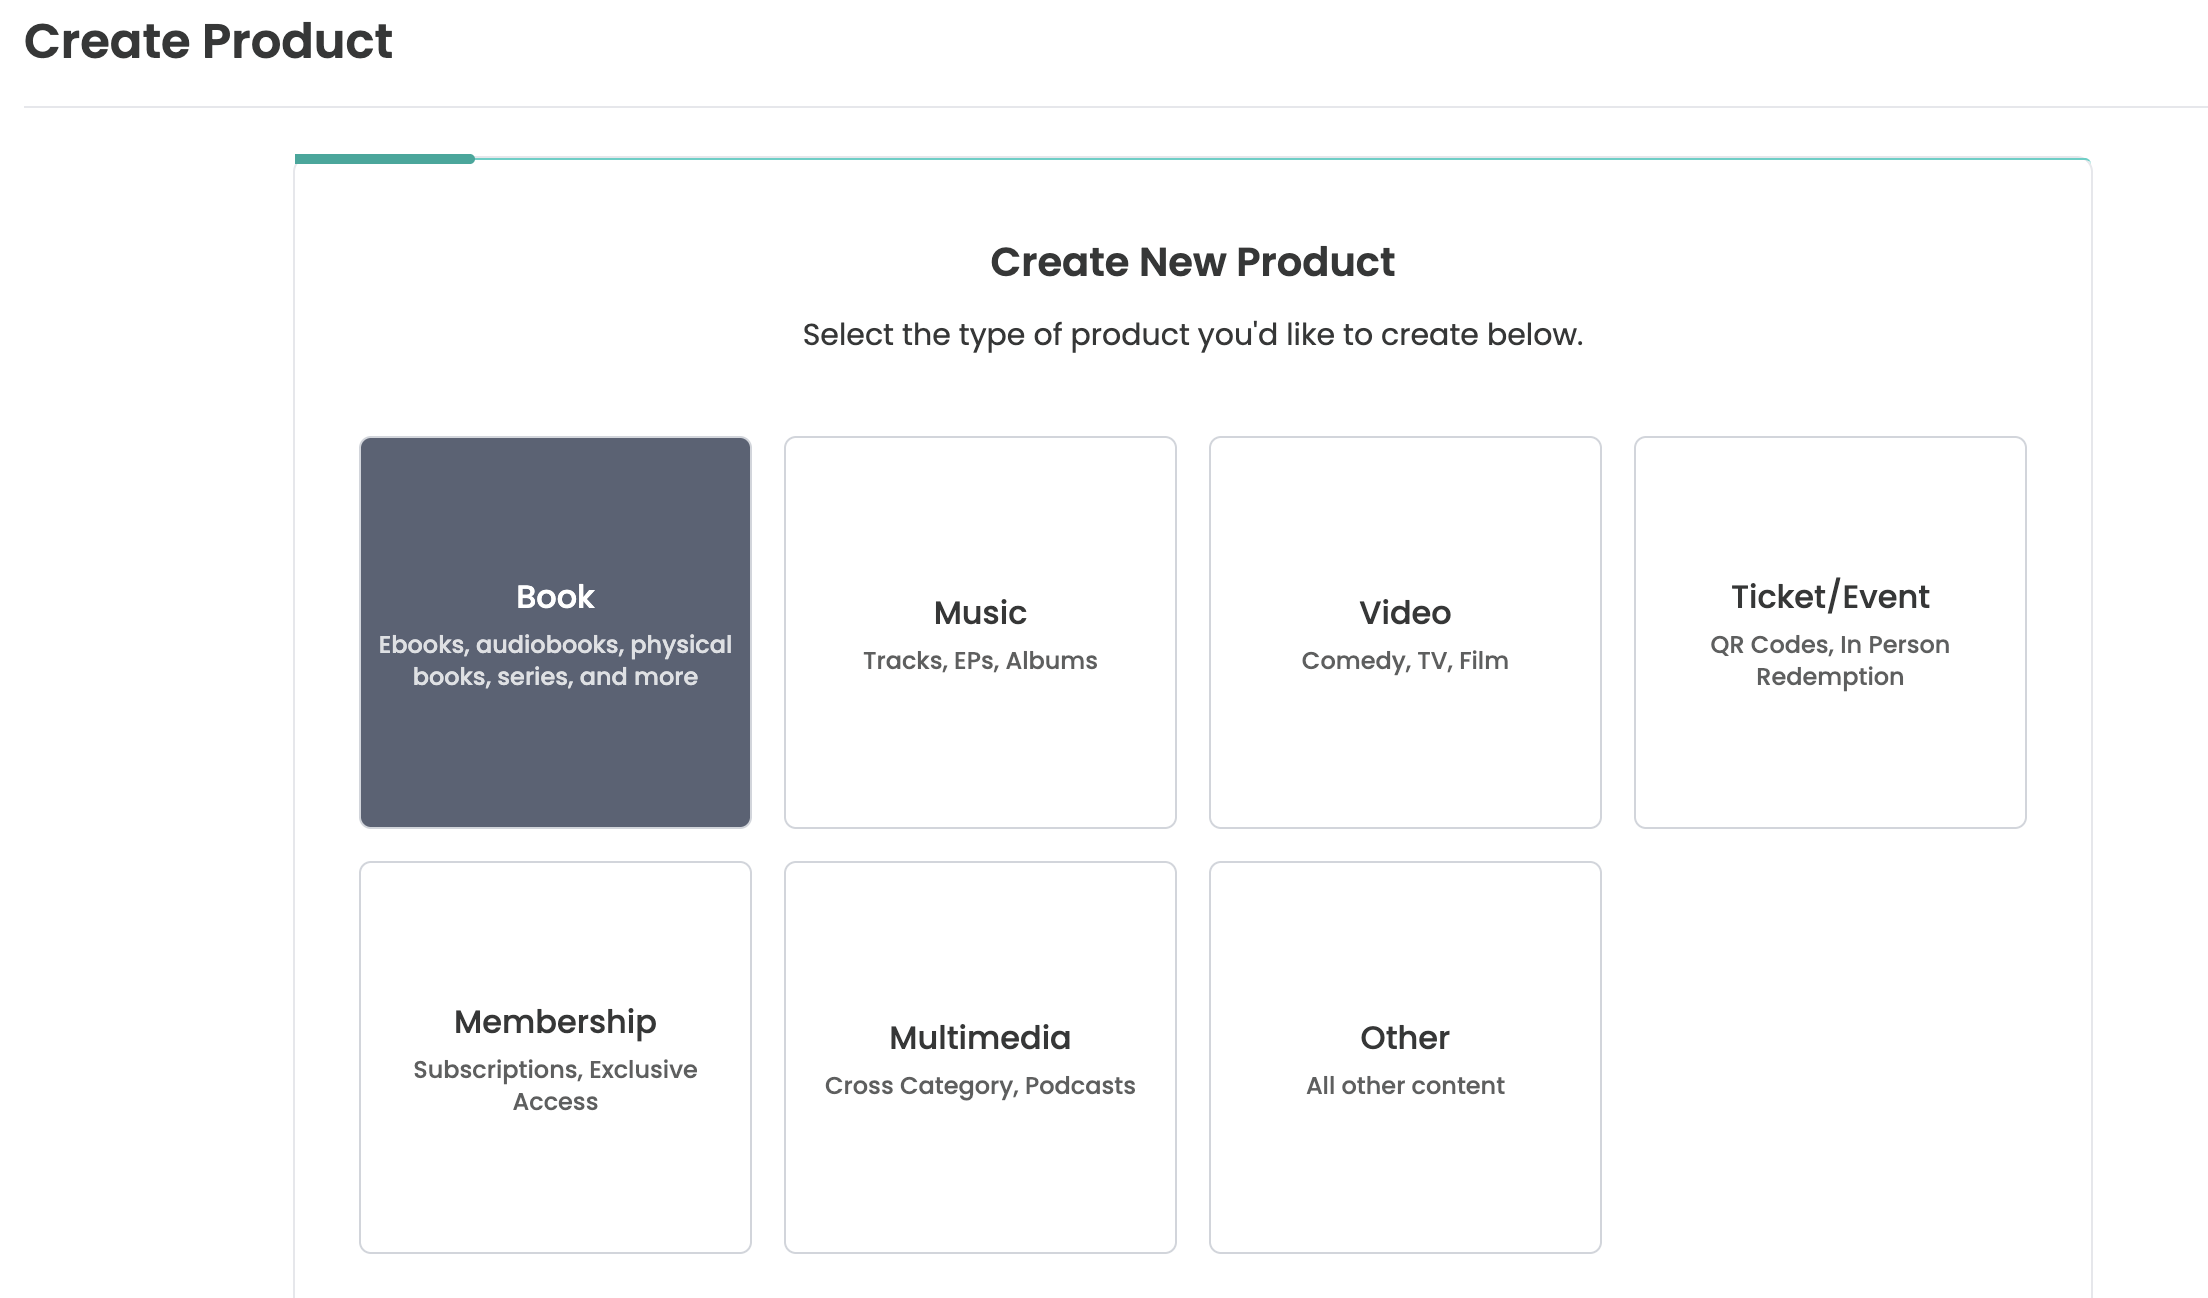
For this example we will create a pre-order for a book.
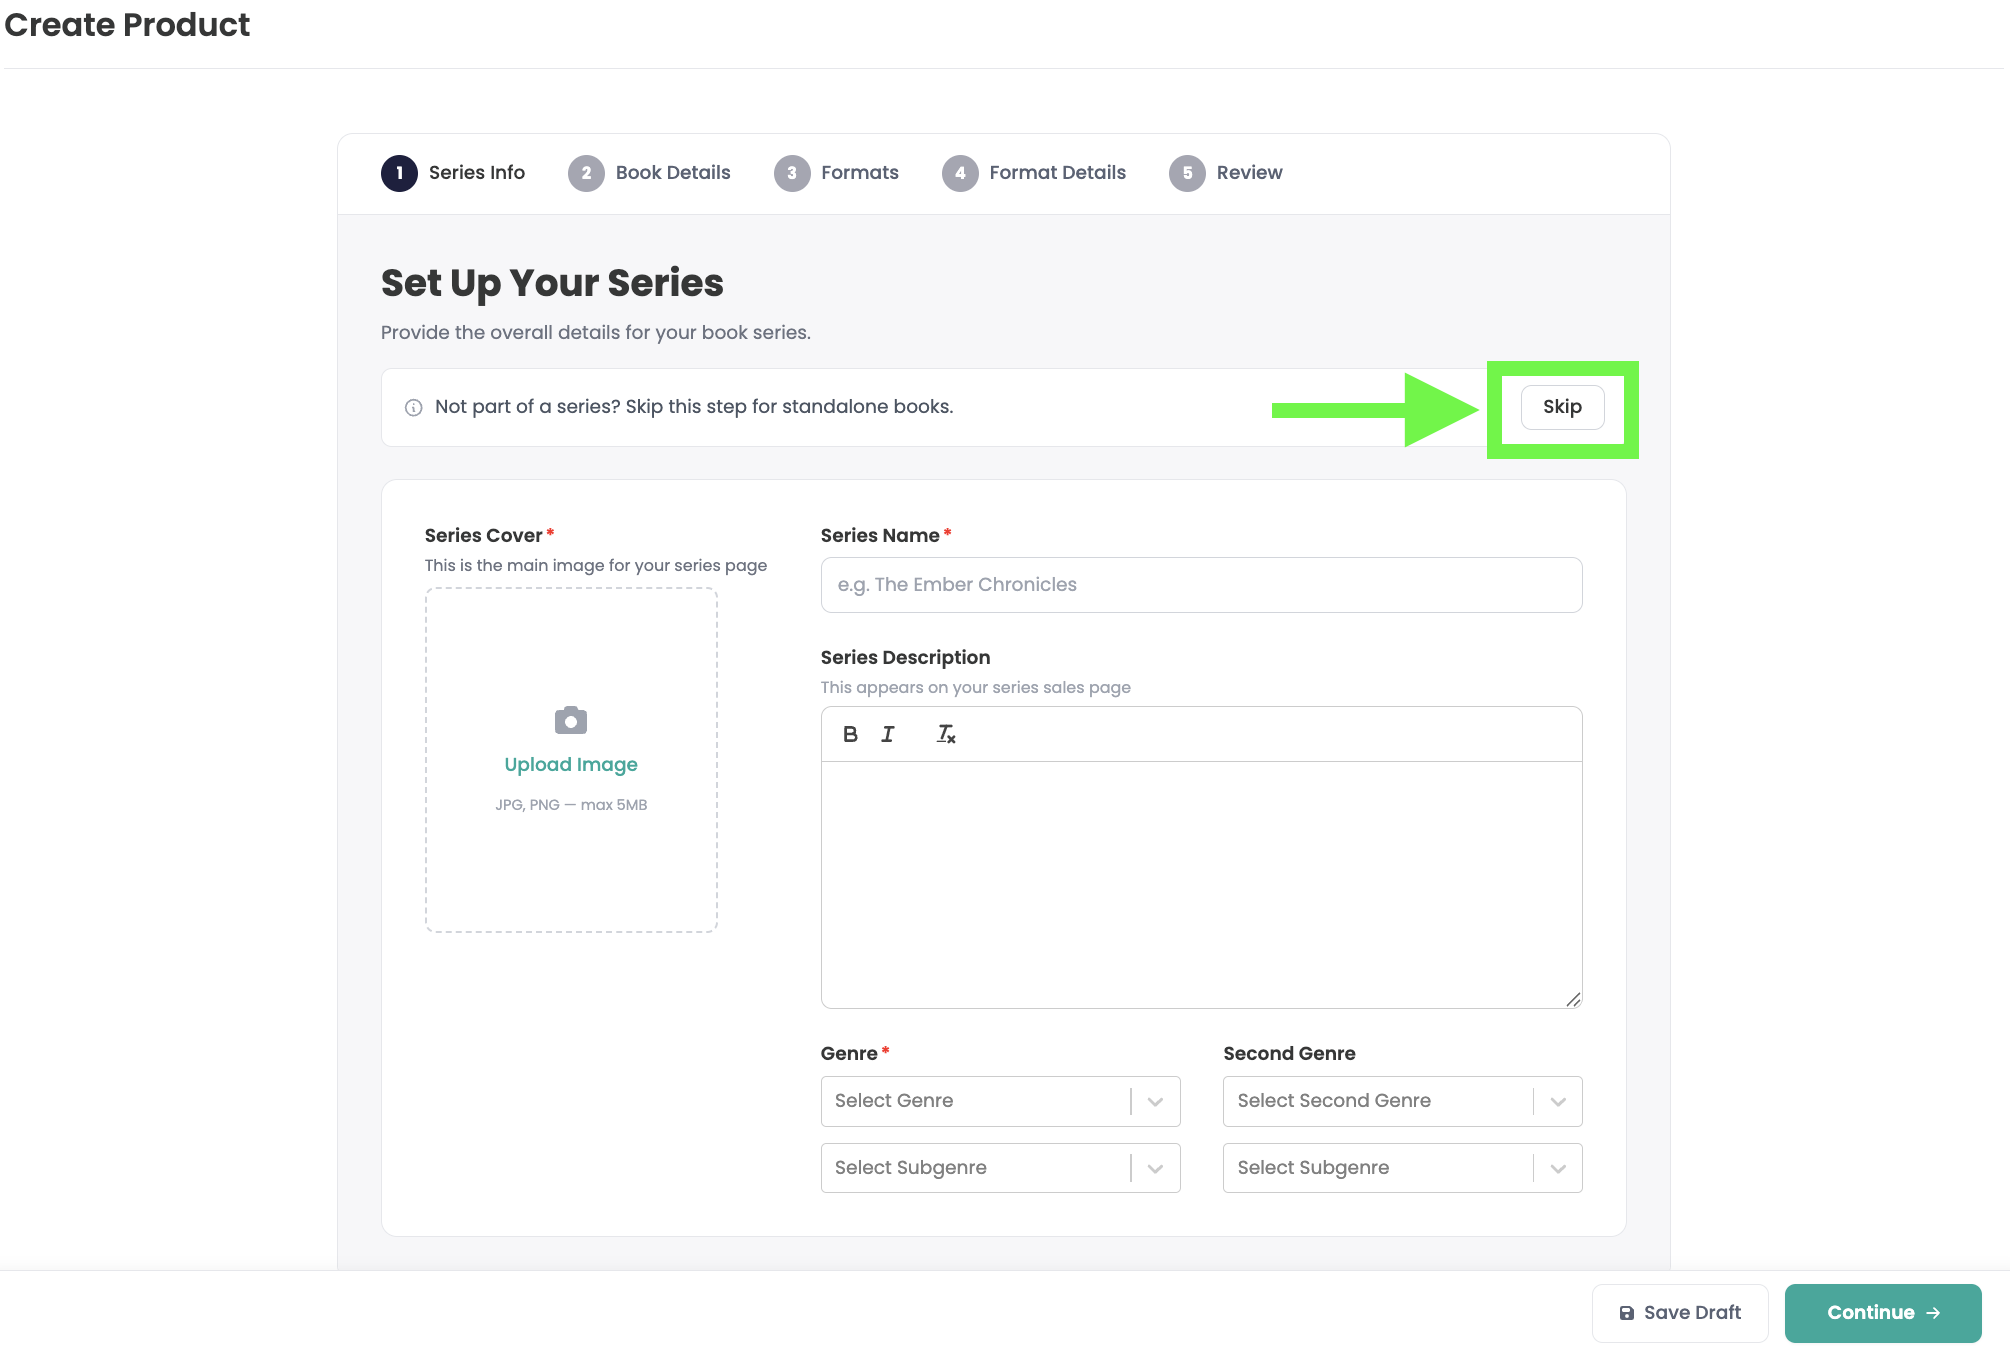
Step 3: Series (optional)
We are going to skip the Series step for this tutorial, but if this book is part of an existing series you can select the series on this page.
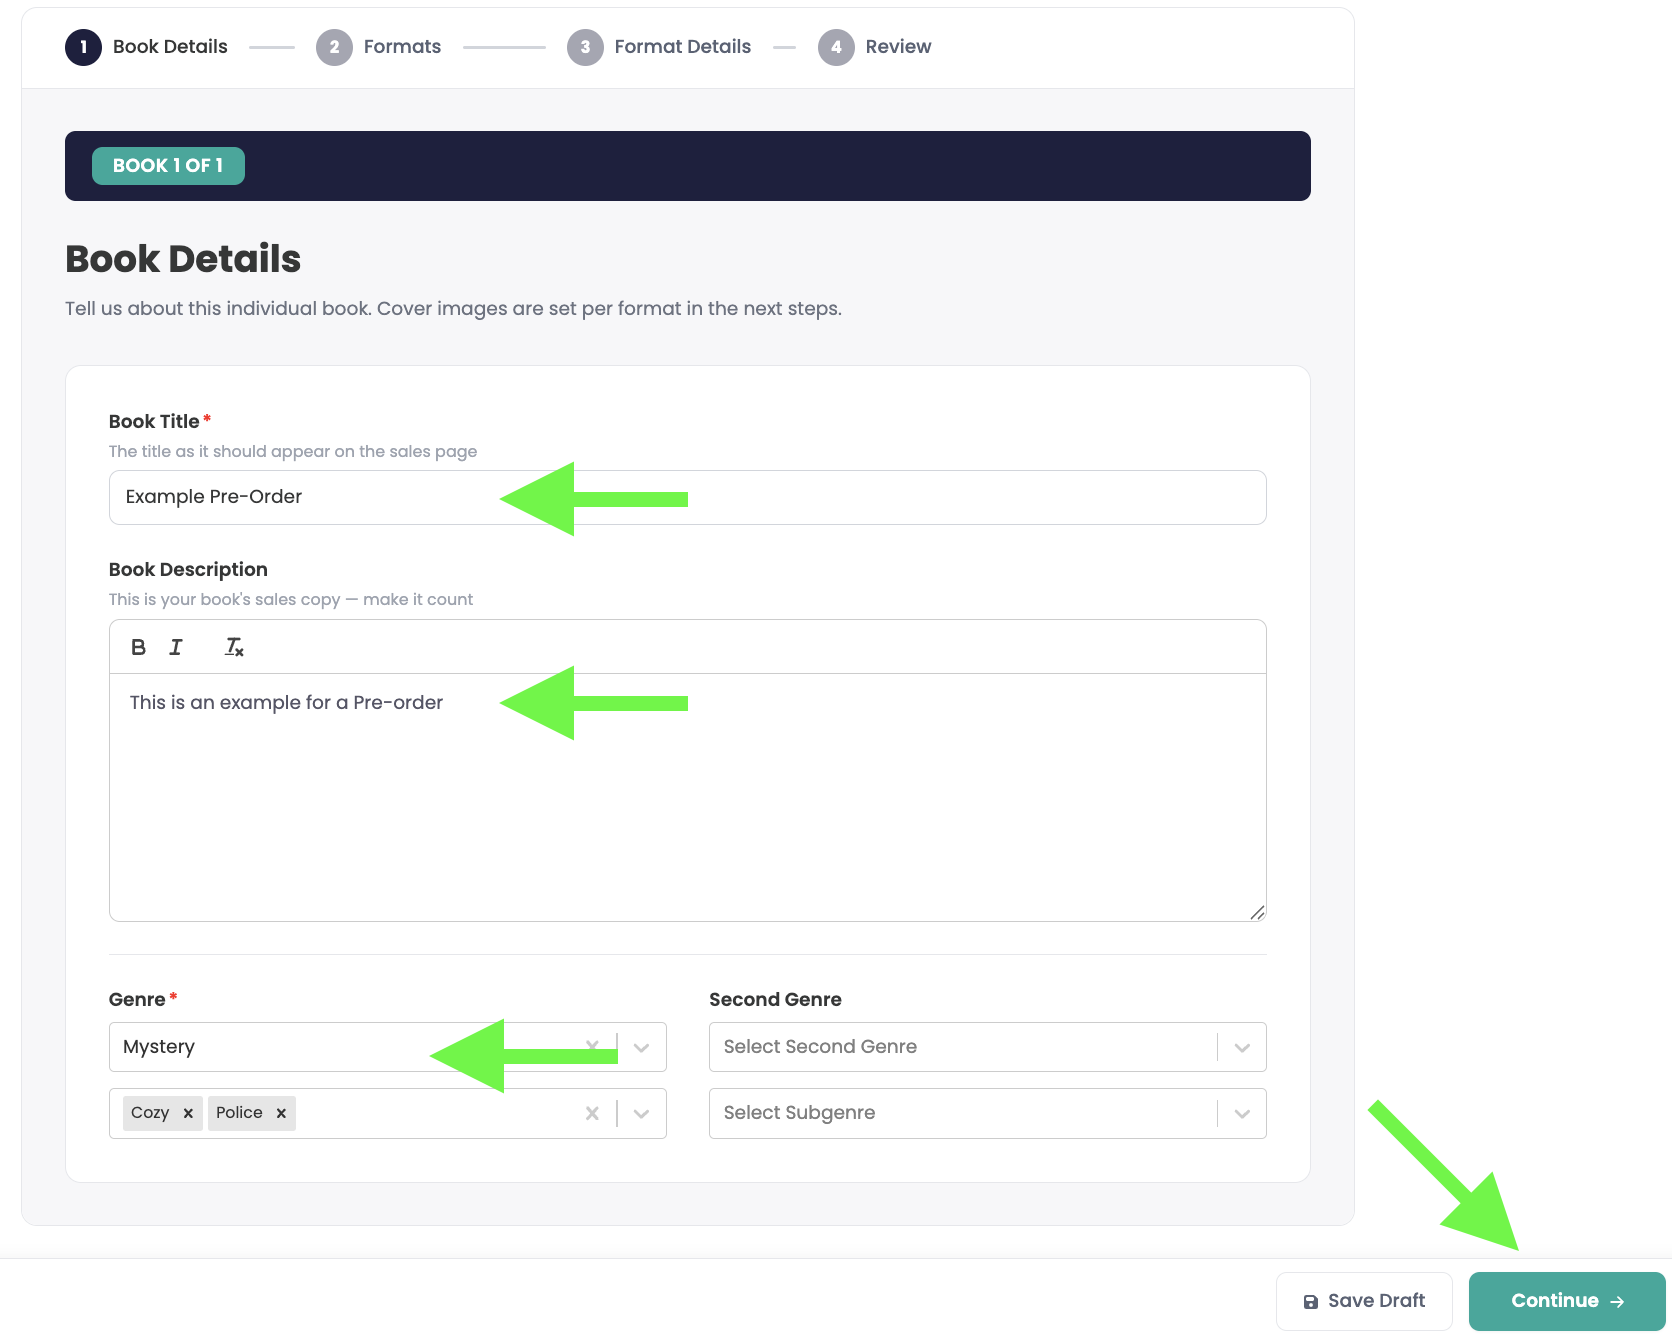
Step 4: Add book details
Next, fill out the book's title, description, and genre information.
Step 5: Choose your formats
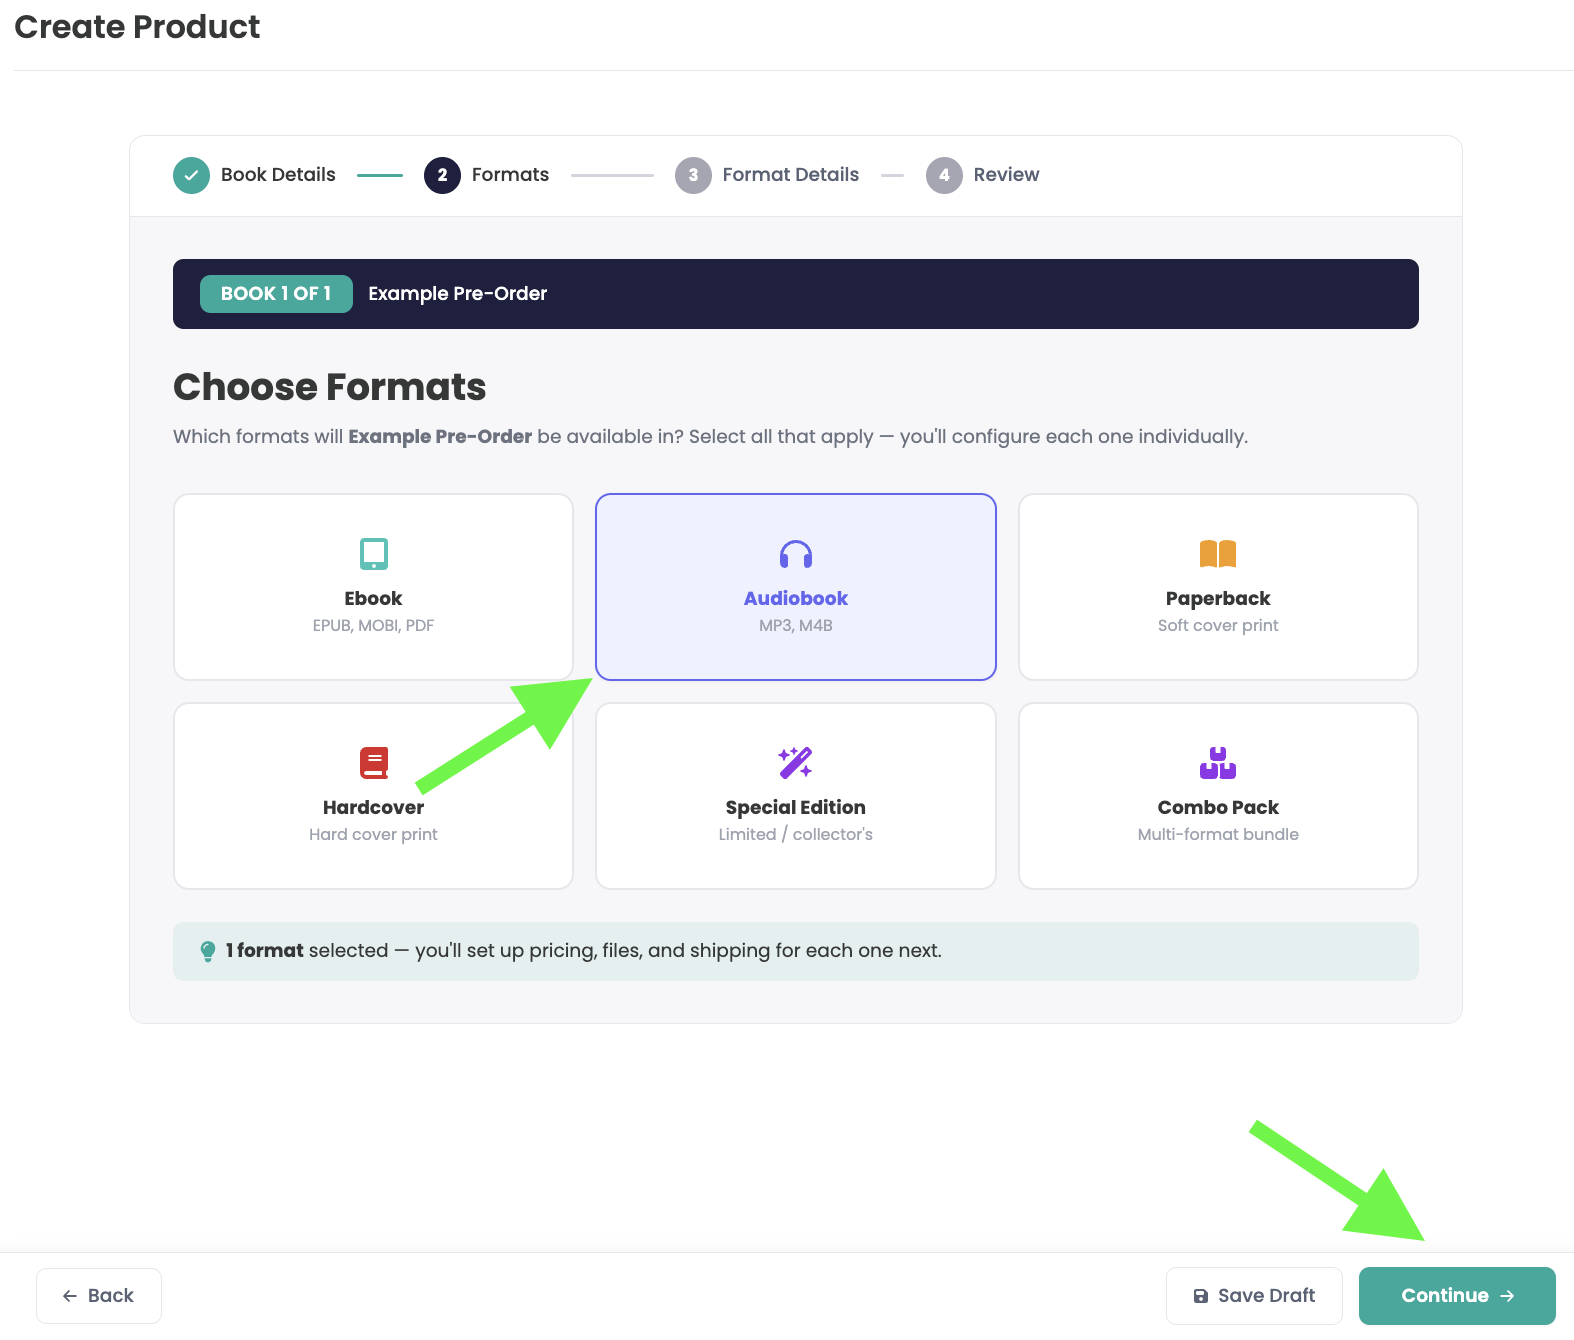
Next, select which formats you will be selling for this book. For this example we will just do an audiobook, however you can set up as many formats as you are willing to offer.
Note: You can always add more formats later — see the Adding formats to an existing book tutorial.
Step 6: Add the cover image
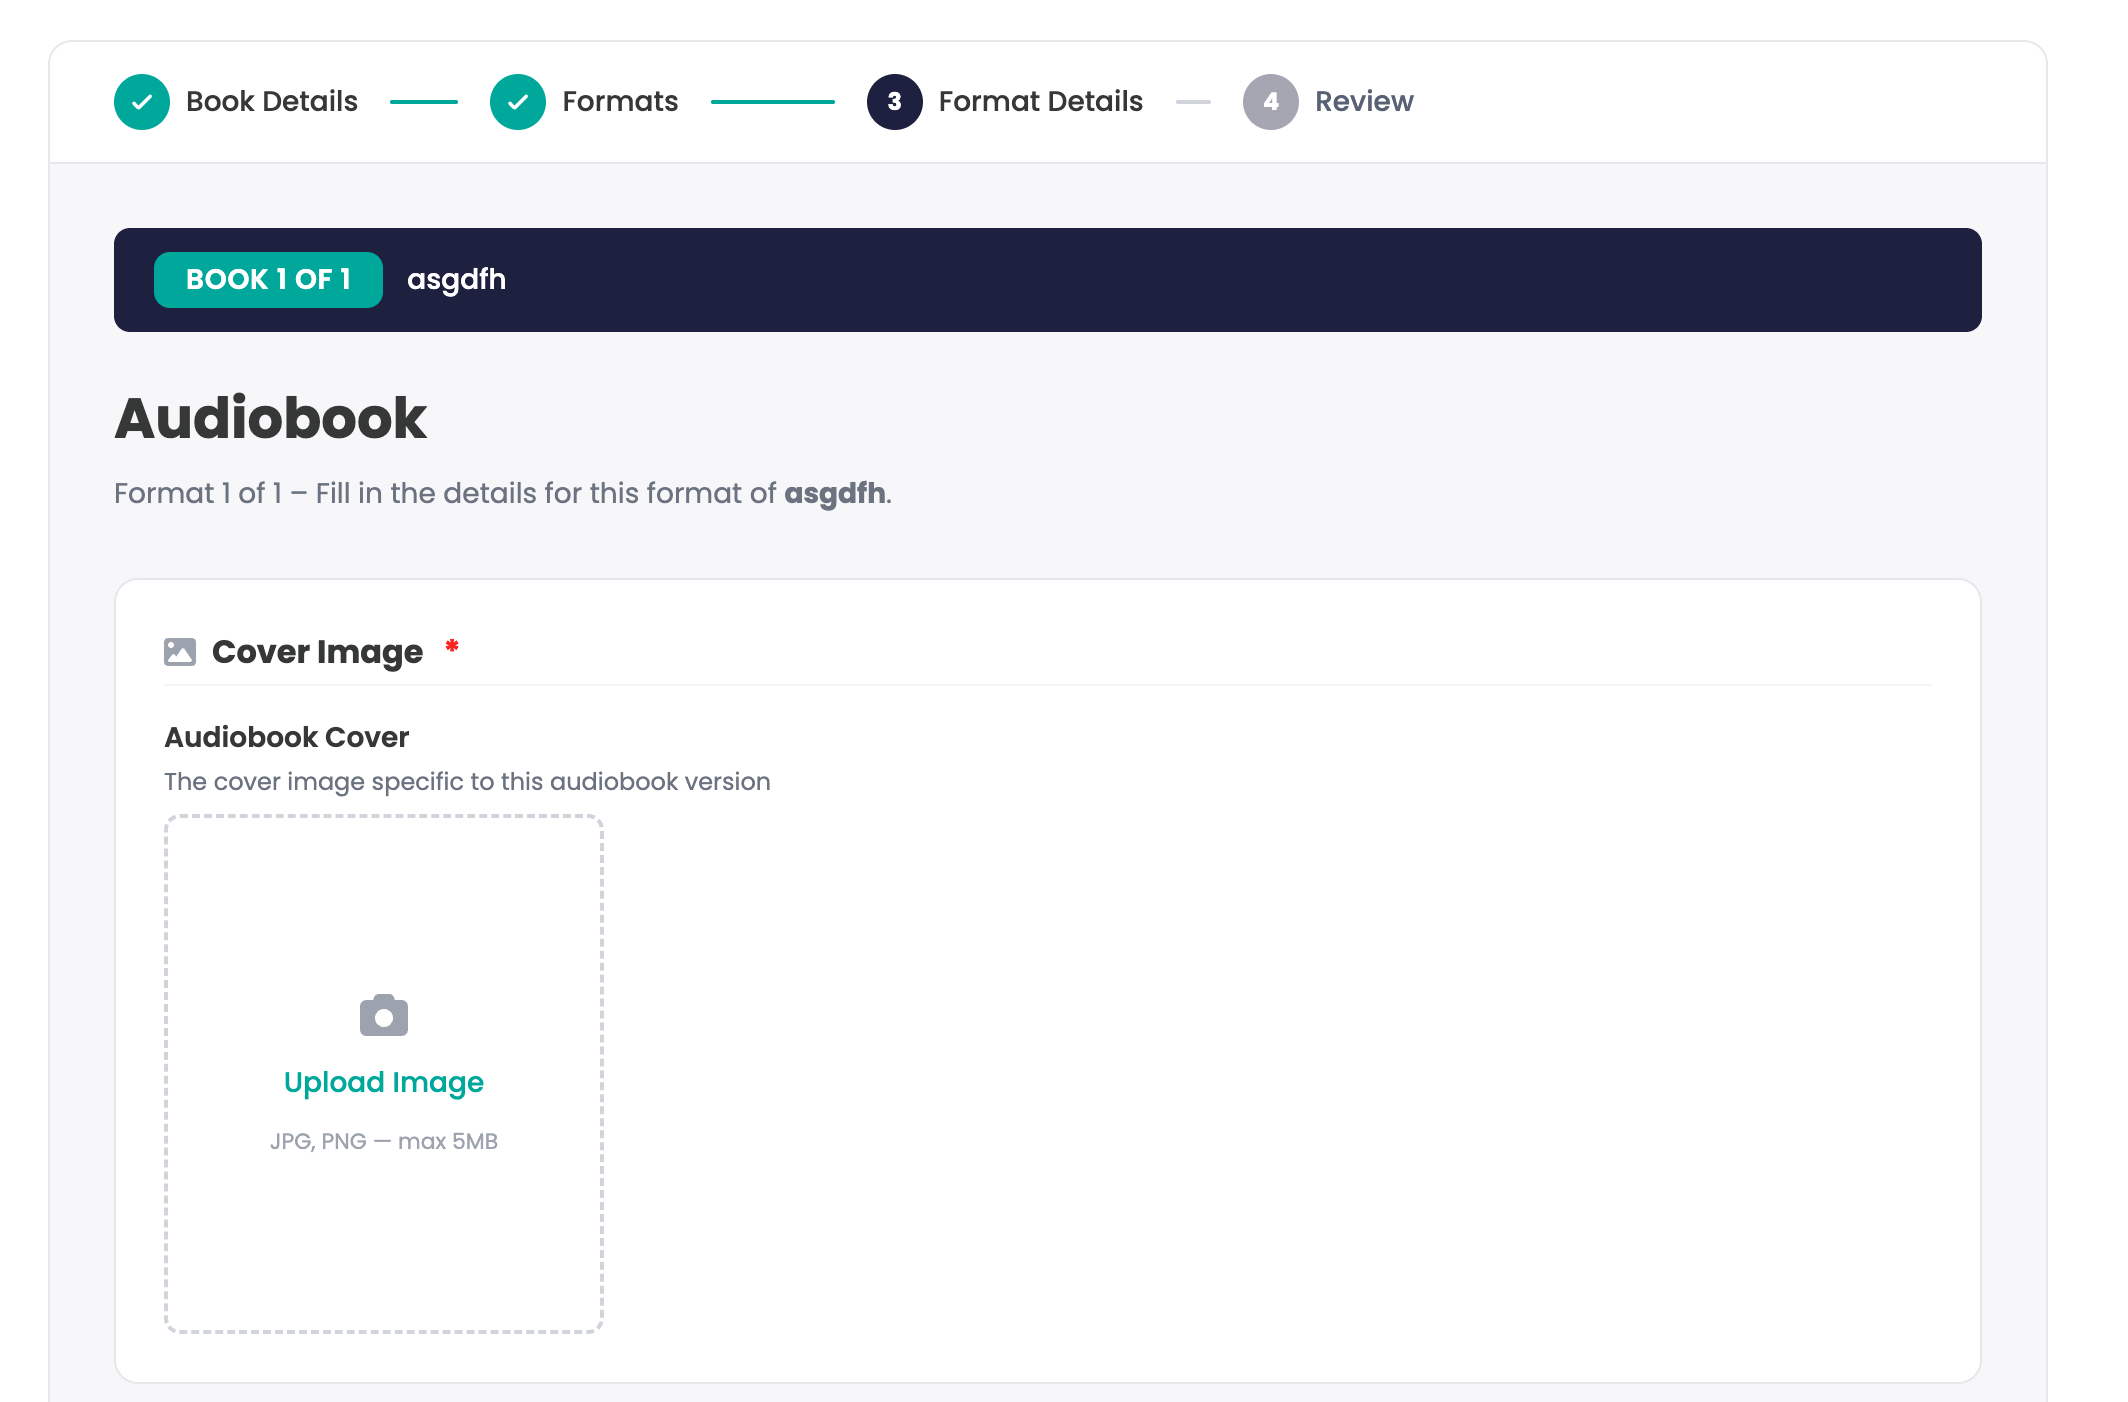
The next page contains the main details for the pre-order. Start by adding the cover image for this specific format. Covers can vary in design or size from format to format, even for the same book.
Step 7: Set up the pre-order
The following area is where you specify the pre-order. We'll cover each part in detail.
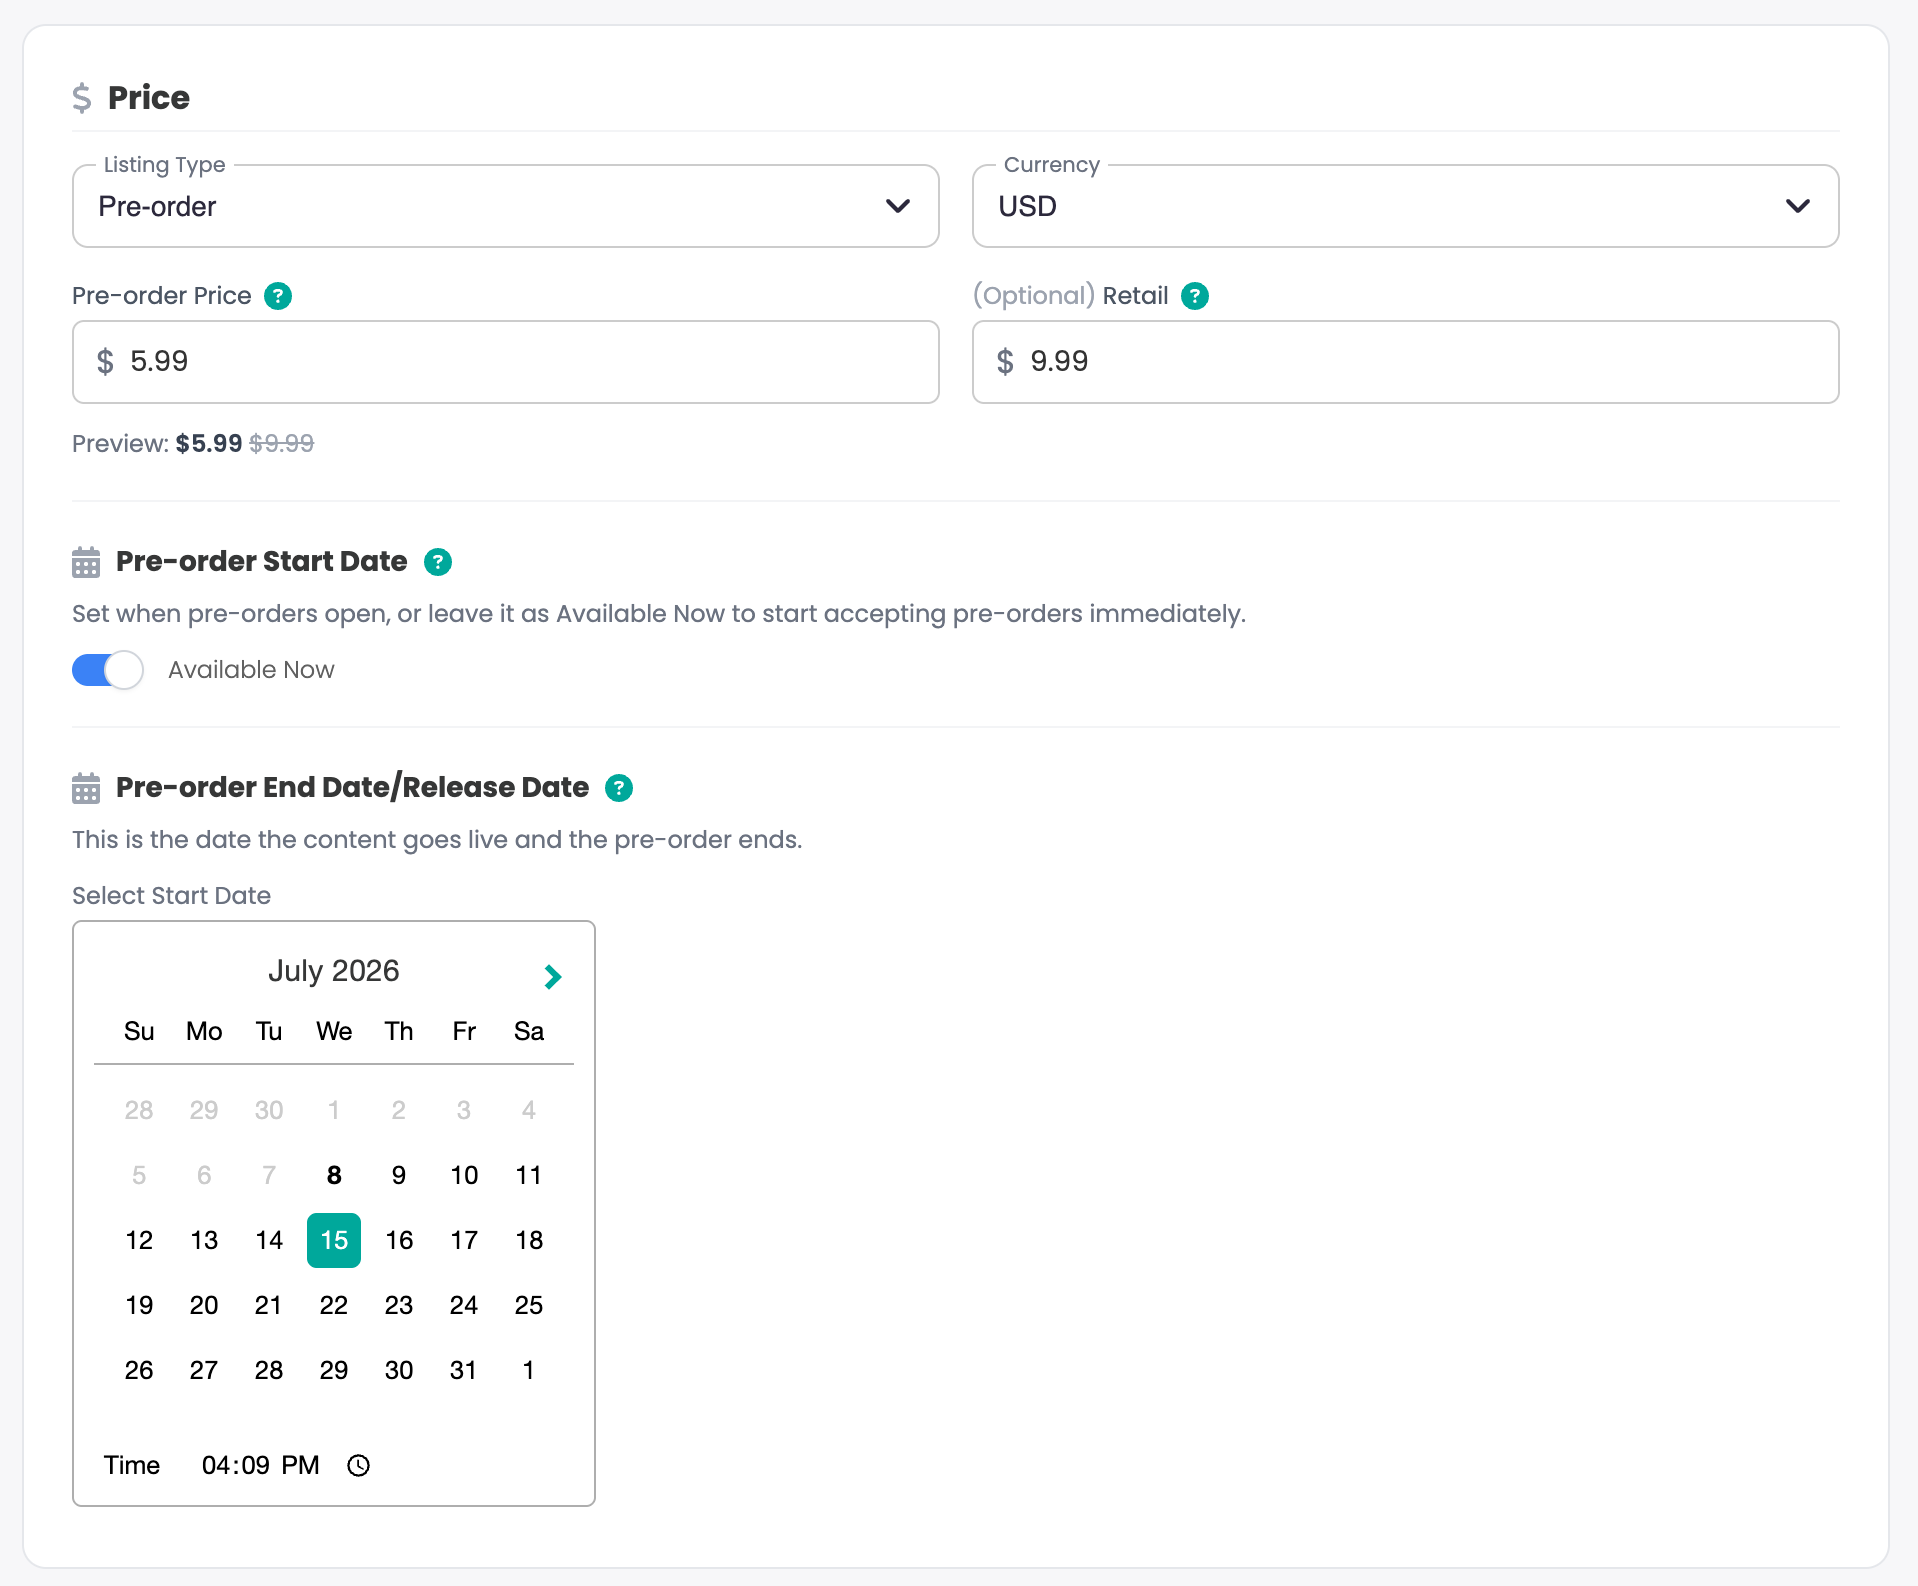
Click the dropdown and select Pre-Order.
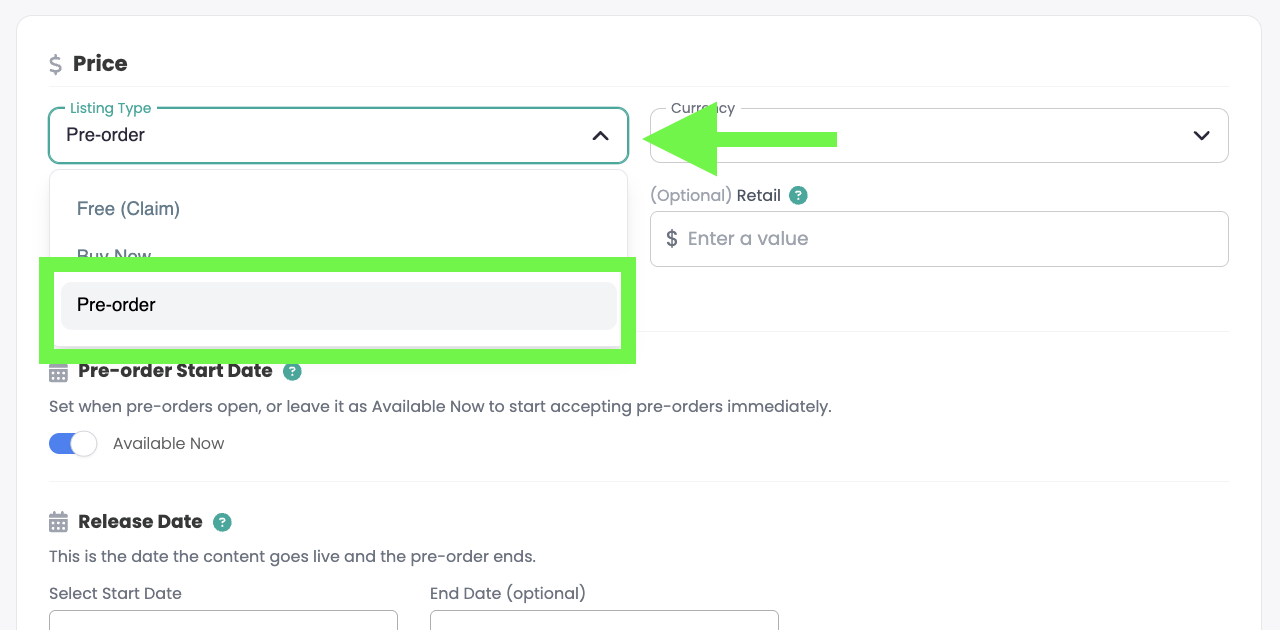
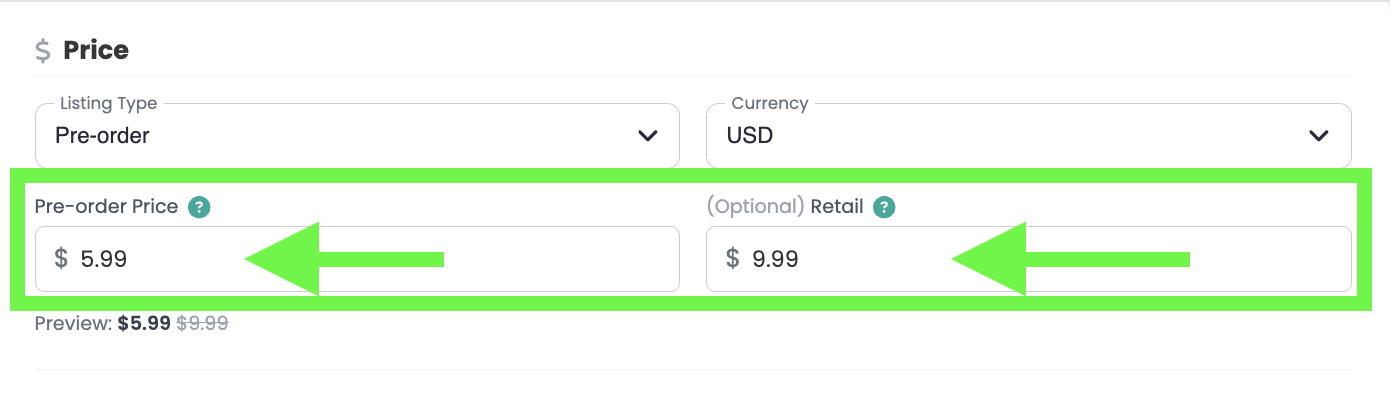
Set a pre-order price — this is the exact amount you collect for each sale of this format during the pre-order period. You can also set a retail price to showcase the markdown or deal a buyer gets by purchasing during the pre-order.
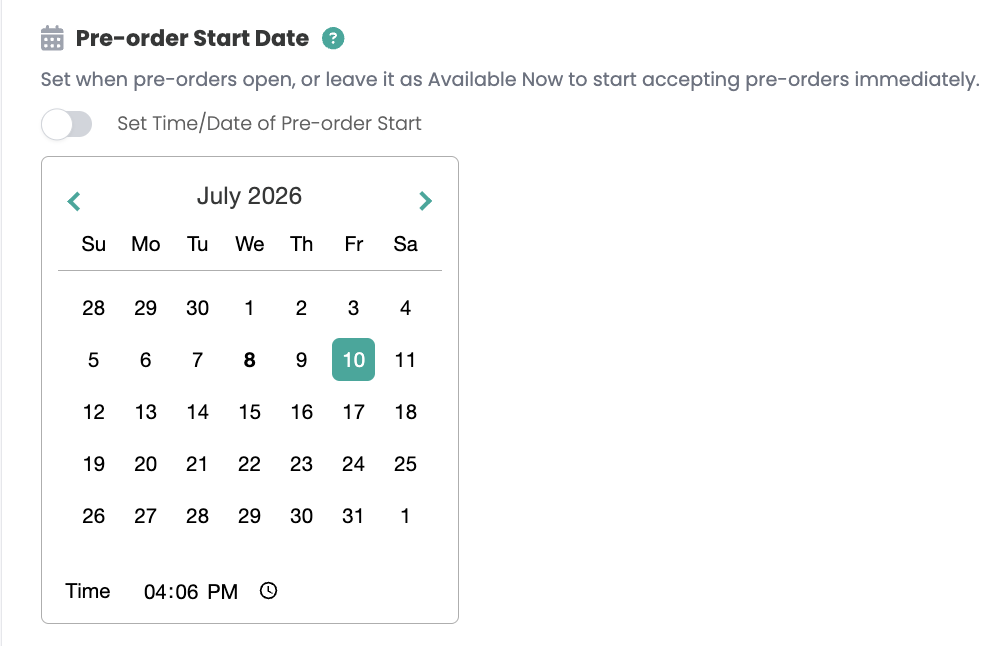
You can specify the exact date and time the pre-order starts. If you leave this toggled on, the pre-order will go live as soon as you complete the setup.

To set a start date and time for the pre-order in the future, toggle this off.
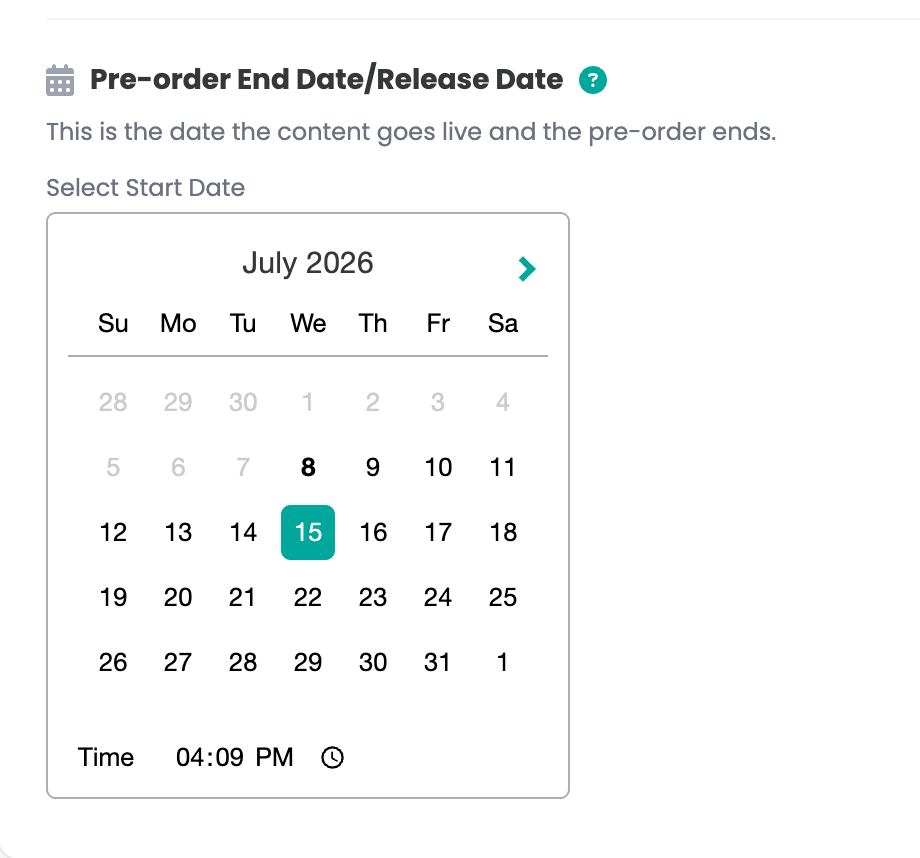
You must also specify the exact end date of the pre-order. This date does several things:
It sets the date and time any digital content becomes available to buyers.
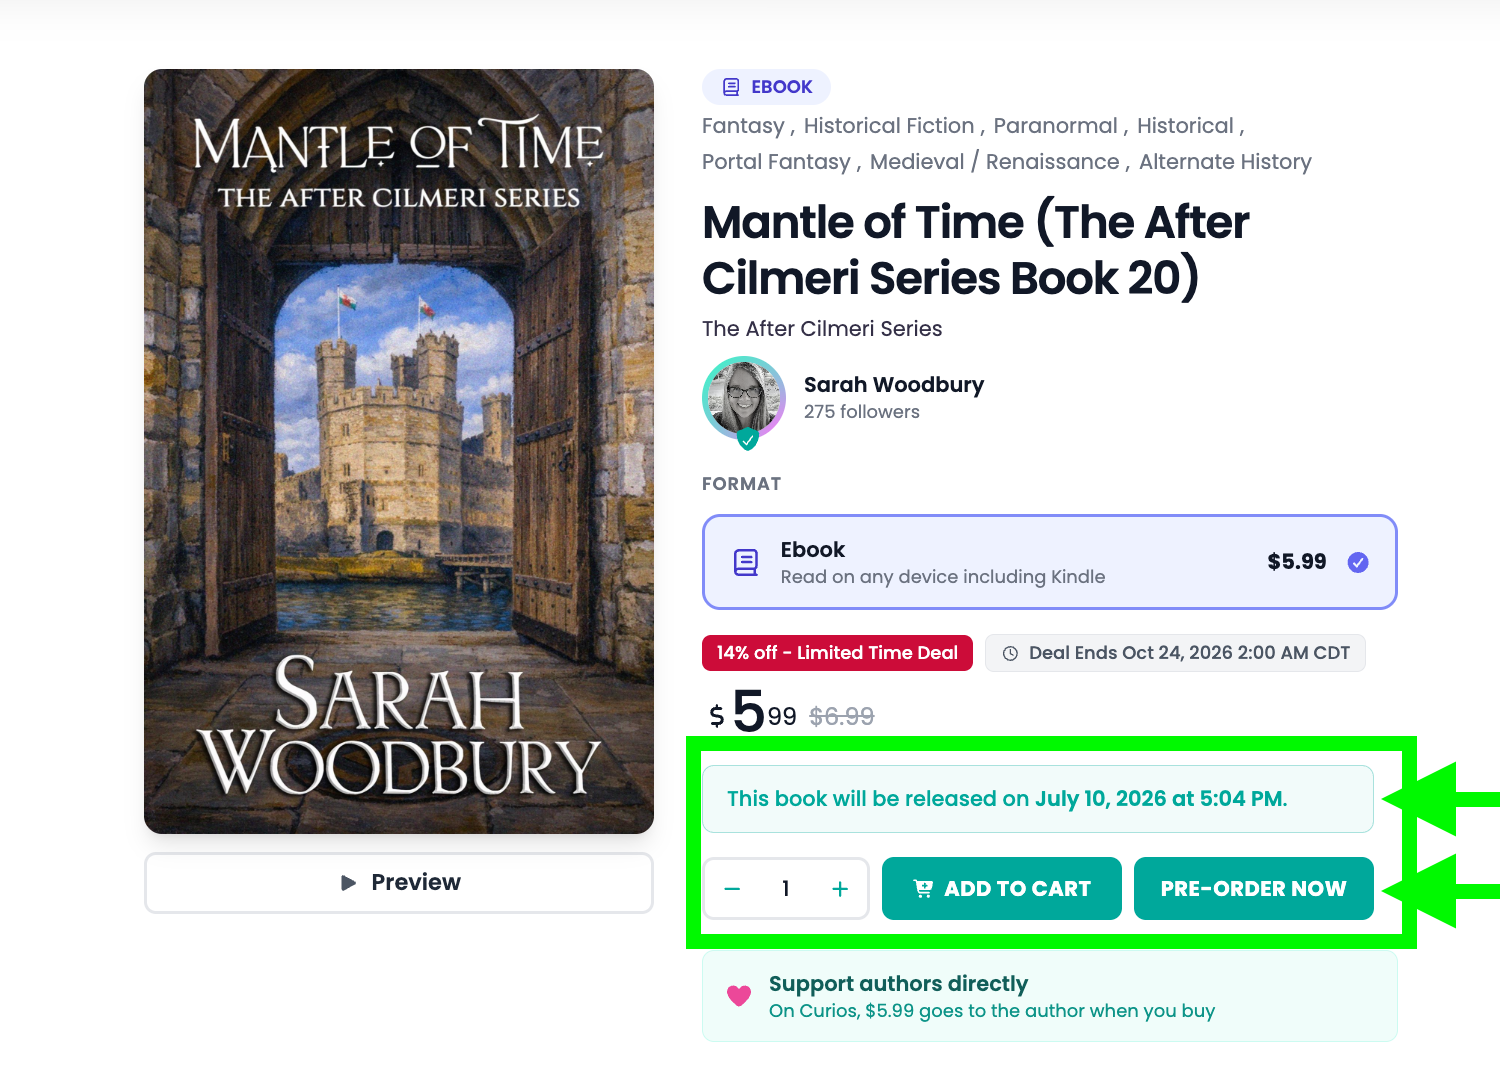
It is shown on the marketplace so buyers know this is a pre-order and content won't be available until the specified date.
It does not mean the item stops selling after this date — it simply marks the transition from a pre-order to a regular order.
Note: This does not mean the price will automatically revert to the retail price. You either update the price manually at the end of the pre-order, or you can schedule a price change.
Here is an example of how the pre-order end date / release date appears on the marketplace.
Step 8: Add digital files or set up fulfillment for physical goods
Next you'll add any files, or, if this is a physical item, specify how it will be fulfilled. This tutorial covers both.
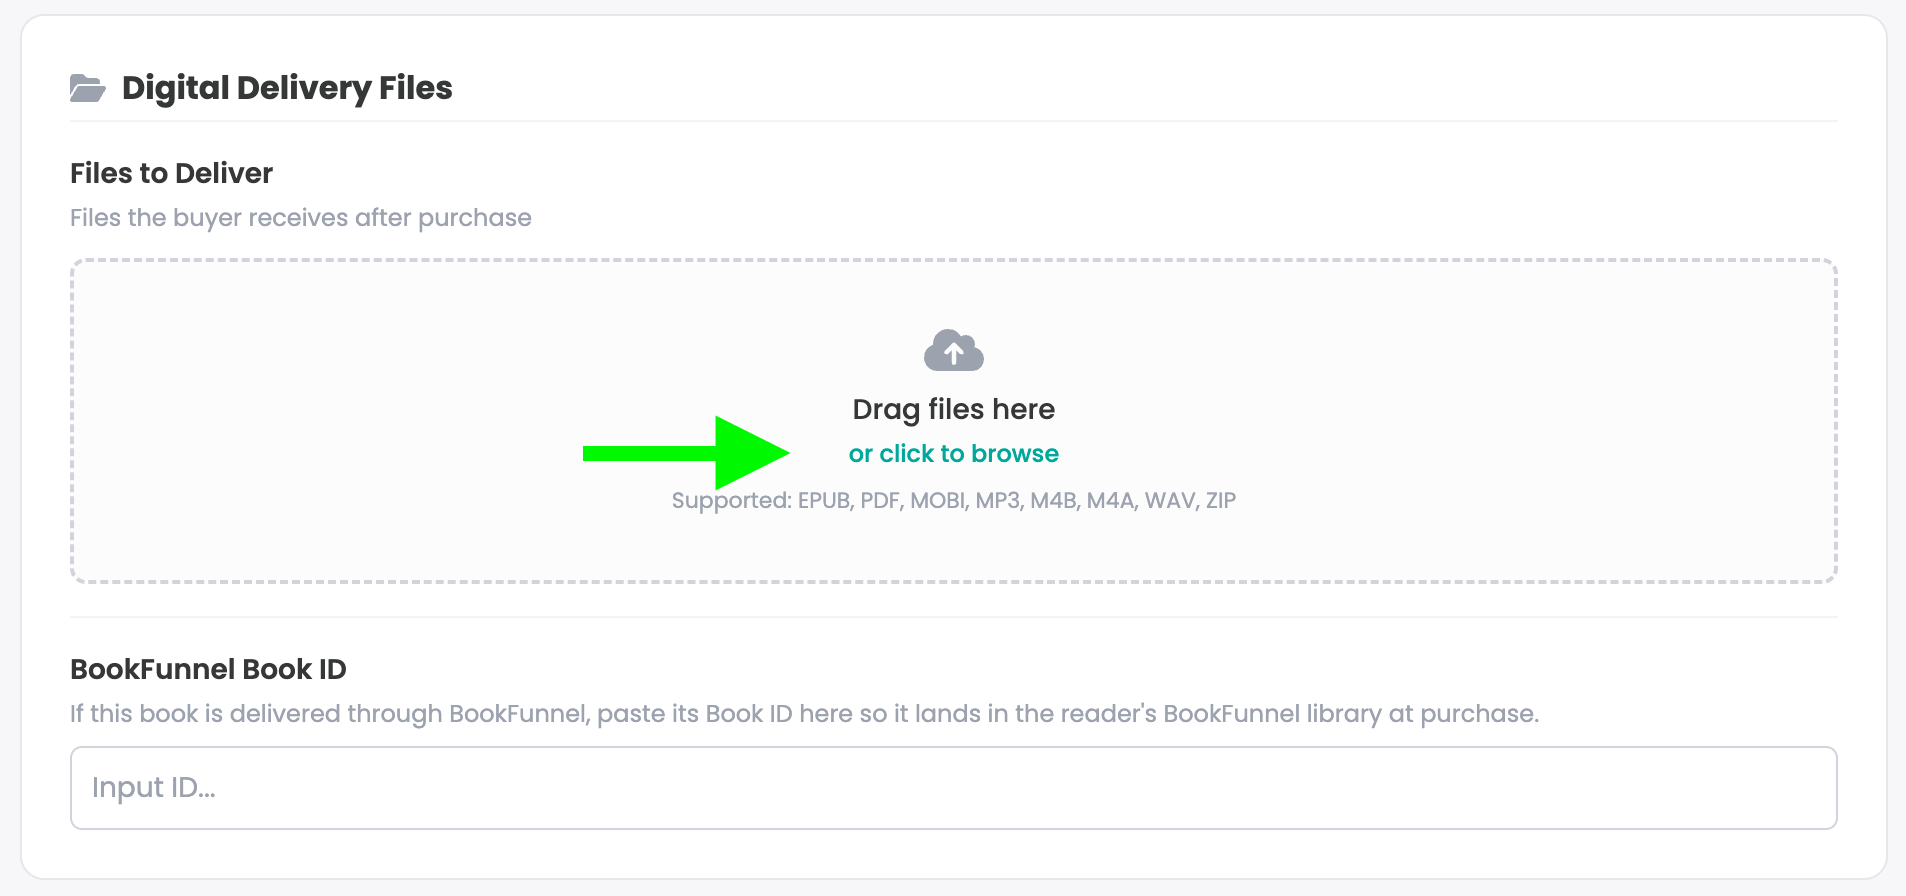
For digital content: if the files are ready, add them under Digital Delivery Files. These are automatically delivered to the customer on the pre-order end date / release date you specified.
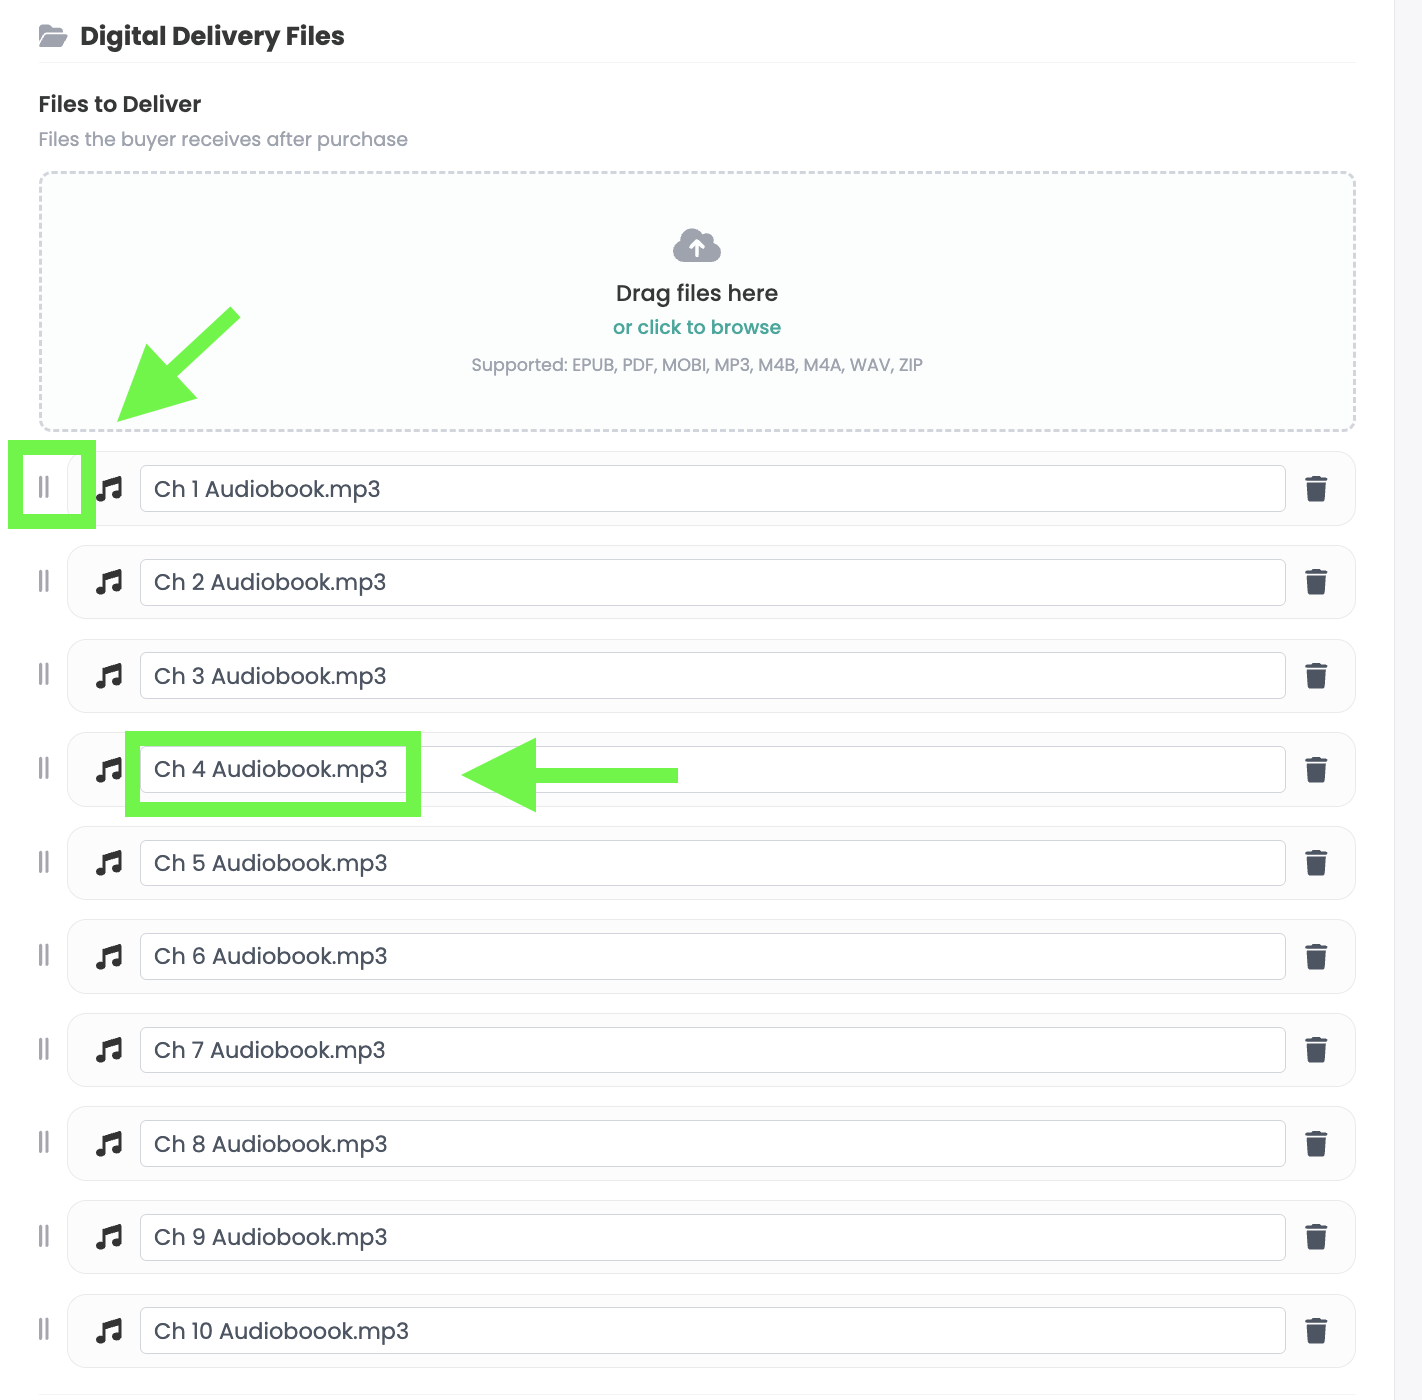
Make sure any files you add are in the correct order. You can reorder files at any time by dragging them up or down the list, and you can rename any uploaded file by clicking its file name.
Note: If you'd like to deliver these files with BookFunnel, you can enter your BookFunnel ID in this area too.
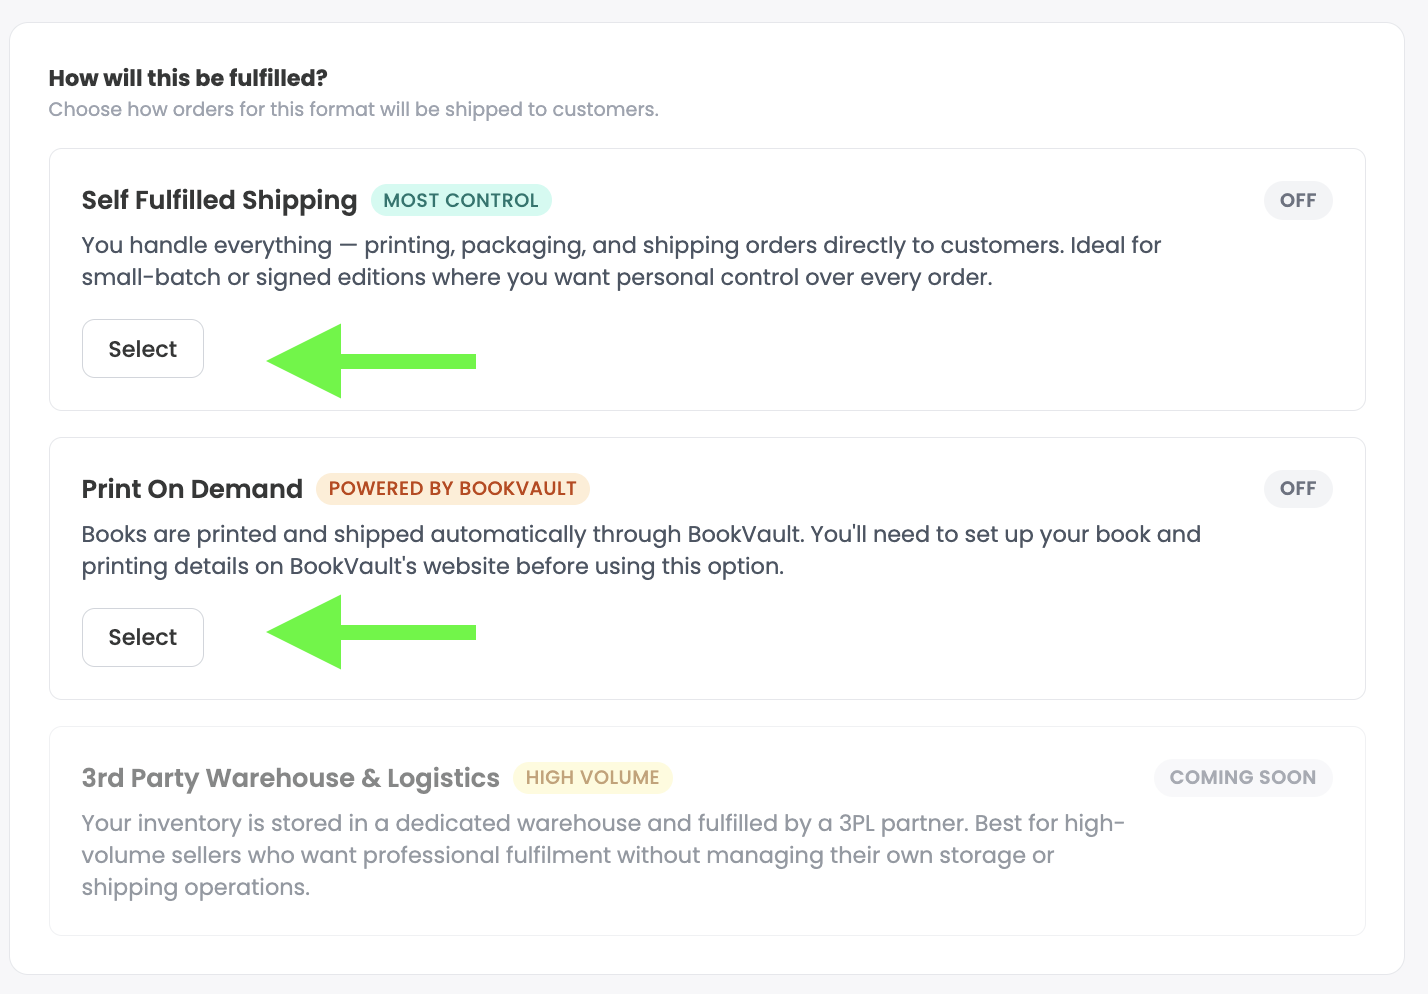
For physical content like paperbacks, hardcovers, merchandise, vinyl, etc., you'll specify how the item will be fulfilled. For books you can choose between Self-Fulfilled Shipping or Print on Demand:
Self-Fulfilled Shipping means you are responsible for packaging and shipping each order from your inventory. Curios collects the shipping cost from the buyer and generates a shipping label for you.
Print on Demand means that when an order comes in, BookVault prints, packs, and ships it for you, and Curios sends tracking and production updates to the customer. This option requires your book to already be set up in BookVault.
Note: For a pre-order, you may not have your book complete or set up in BookVault yet — please reach out to Curios support if this is the case.
Step 9: Add preview files
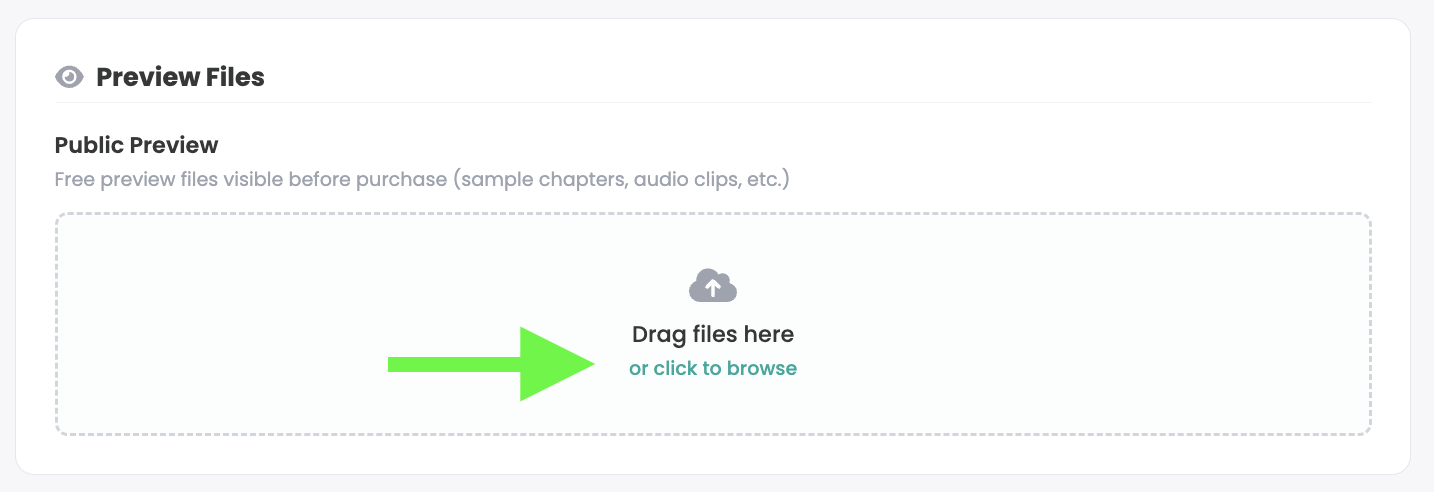
Next is the Preview File area. This is where you upload any preview files — retail samples for audio, a trailer for video, or any media that helps the buyer understand what they're buying.
Note: For ebooks, Curios automatically generates a preview file for you based on any EPUBs you upload.
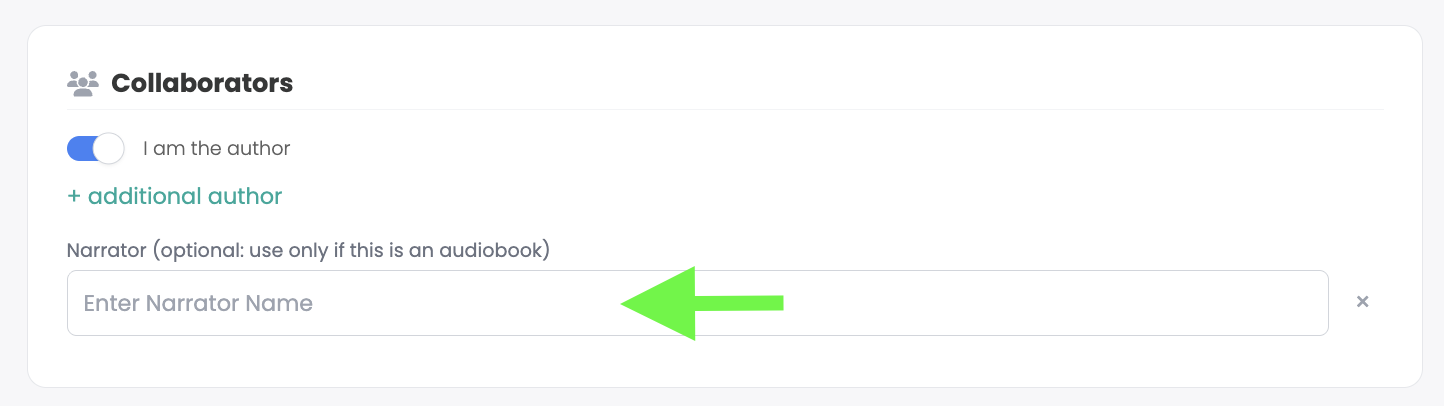
Step 10: Add collaborators
Next is the collaborator section. This is where you can add information about a narrator for an audiobook, or any co-creators involved in this product. If you're using a pen name, toggle off "I am the author" and enter the author name for this specific book.
Step 11: Set permissions
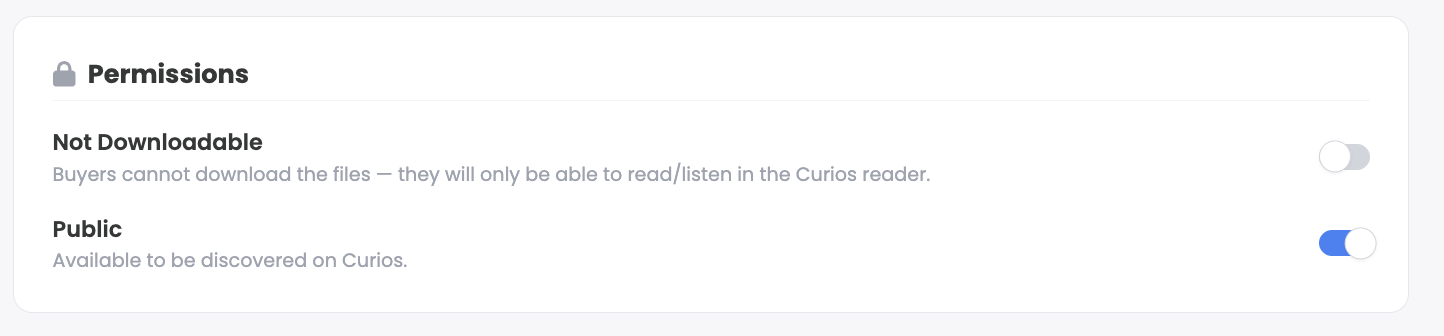
Next is the permissions area. If the format is digital, this is where you choose whether the item is downloadable, and whether the item is private.
Note: Private items require the buyer to have a specific URL (link) to see the book. Private items are not searchable or discoverable on the marketplace and are only available to those who have the specific link.
Step 12: Review and publish
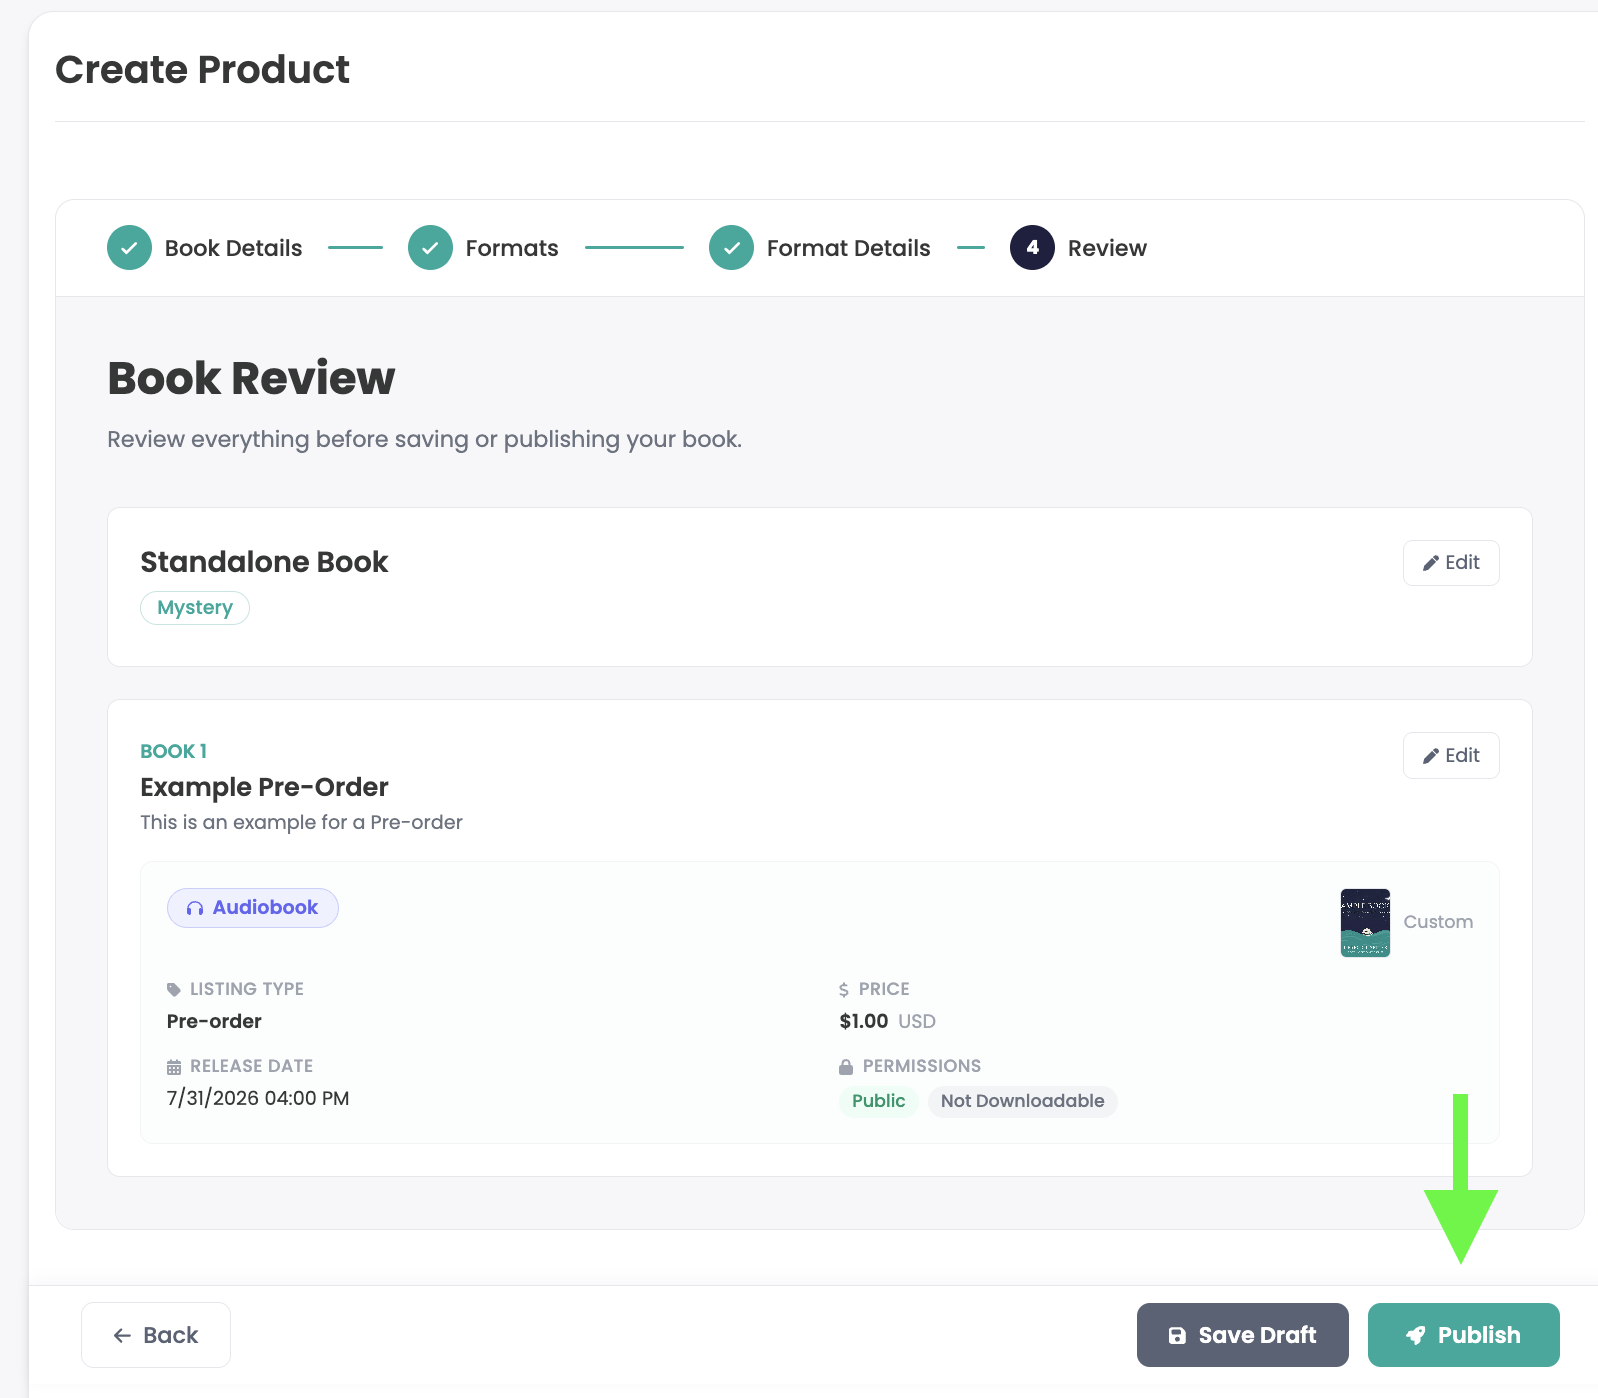
Last, you'll see a review page — useful for double-checking the information you just entered. Clicking Publish immediately publishes this item to the curios.com marketplace. Clicking Save Draft saves everything so you can edit or fill in missing information before it goes live.
Note: You are in control of any items you list on Curios. You can change pricing, content, dates, or anything else at any time, even after you publish.
Making changes and reporting
If you ever need to change any information for your pre-order, simply click the item on the Curios Studio dashboard to open the Product Detail page, where you can edit or make any changes needed.
To see how to schedule a price change, view the Scheduling a price change tutorial.
To access the email list of anyone who participates in the pre-order, click Statements / Payouts in the Studio menu, or see the How to get paid on Curios tutorial.
Setting Up a Pre-Order on Curios
This tutorial will walk you through how to use Curios for a pre-order. Curios works particularly well for a pre-order for the following reasons:
You keep 100% of any sales — there is no loss, which allows you to discount your offerings to make the pre-order appealing.
Curios has instant fulfillment baked in. When your item goes live you won't have to find another service to deliver the files and coordinate the delivery date.
You garner the email addresses right away, so you can keep buyers well informed of any updates.
You can schedule price changes, so the minute the item goes from pre-order to live, the price can change too.
Curios integrates with BookVault for any domestic or global Print on Demand books or merchandise.
To set up a pre-order on Curios
Step 1: Log in
Go to studio.curios.com and log in with your email address, then enter the code provided.
Step 2: Start a new product
Click + Publish / Add New Product in the left-hand menu.
For this example we will create a pre-order for a book.
Step 3: Series (optional)
We are going to skip the Series step for this tutorial, but if this book is part of an existing series you can select the series on this page.
Step 4: Add book details
Next, fill out the book's title, description, and genre information.
Step 5: Choose your formats
Next, select which formats you will be selling for this book. For this example we will just do an audiobook, however you can set up as many formats as you are willing to offer.
Note: You can always add more formats later — see the Adding formats to an existing book tutorial.
Step 6: Add the cover image
The next page contains the main details for the pre-order. Start by adding the cover image for this specific format. Covers can vary in design or size from format to format, even for the same book.
Step 7: Set up the pre-order
The following area is where you specify the pre-order. We'll cover each part in detail.
Click the dropdown and select Pre-Order.
Set a pre-order price — this is the exact amount you collect for each sale of this format during the pre-order period. You can also set a retail price to showcase the markdown or deal a buyer gets by purchasing during the pre-order.
You can specify the exact date and time the pre-order starts. If you leave this toggled on, the pre-order will go live as soon as you complete the setup.
To set a start date and time for the pre-order in the future, toggle this off.
You must also specify the exact end date of the pre-order. This date does several things:
It sets the date and time any digital content becomes available to buyers.
It is shown on the marketplace so buyers know this is a pre-order and content won't be available until the specified date.
It does not mean the item stops selling after this date — it simply marks the transition from a pre-order to a regular order.
Note: This does not mean the price will automatically revert to the retail price. You either update the price manually at the end of the pre-order, or you can schedule a price change.
Here is an example of how the pre-order end date / release date appears on the marketplace.
Step 8: Add digital files or set up fulfillment for physical goods
Next you'll add any files, or, if this is a physical item, specify how it will be fulfilled. This tutorial covers both.
For digital content: if the files are ready, add them under Digital Delivery Files. These are automatically delivered to the customer on the pre-order end date / release date you specified.
Make sure any files you add are in the correct order. You can reorder files at any time by dragging them up or down the list, and you can rename any uploaded file by clicking its file name.
Note: If you'd like to deliver these files with BookFunnel, you can enter your BookFunnel ID in this area too.
For physical content like paperbacks, hardcovers, merchandise, vinyl, etc., you'll specify how the item will be fulfilled. For books you can choose between Self-Fulfilled Shipping or Print on Demand:
Self-Fulfilled Shipping means you are responsible for packaging and shipping each order from your inventory. Curios collects the shipping cost from the buyer and generates a shipping label for you.
Print on Demand means that when an order comes in, BookVault prints, packs, and ships it for you, and Curios sends tracking and production updates to the customer. This option requires your book to already be set up in BookVault.
Note: For a pre-order, you may not have your book complete or set up in BookVault yet — please reach out to Curios support if this is the case.
Step 9: Add preview files
Next is the Preview File area. This is where you upload any preview files — retail samples for audio, a trailer for video, or any media that helps the buyer understand what they're buying.
Note: For ebooks, Curios automatically generates a preview file for you based on any EPUBs you upload.
Step 10: Add collaborators
Next is the collaborator section. This is where you can add information about a narrator for an audiobook, or any co-creators involved in this product. If you're using a pen name, toggle off "I am the author" and enter the author name for this specific book.
Step 11: Set permissions
Next is the permissions area. If the format is digital, this is where you choose whether the item is downloadable, and whether the item is private.
Note: Private items require the buyer to have a specific URL (link) to see the book. Private items are not searchable or discoverable on the marketplace and are only available to those who have the specific link.
Step 12: Review and publish
Last, you'll see a review page — useful for double-checking the information you just entered. Clicking Publish immediately publishes this item to the curios.com marketplace. Clicking Save Draft saves everything so you can edit or fill in missing information before it goes live.
Note: You are in control of any items you list on Curios. You can change pricing, content, dates, or anything else at any time, even after you publish.
Making changes and reporting
If you ever need to change any information for your pre-order, simply click the item on the Curios Studio dashboard to open the Product Detail page, where you can edit or make any changes needed.
To see how to schedule a price change, view the Scheduling a price change tutorial.
To access the email list of anyone who participates in the pre-order, click Statements / Payouts in the Studio menu, or see the How to get paid on Curios tutorial.
Ready to sell direct and keep 100%?
No credit card required. Join creators building real businesses on their own terms.